DIYing your music studio is a great way to improve the quality of your practice and final product. A great studio can help you achieve excellent acoustic performance that eliminates reverberation and echo. This means your recordings will sound as crisp and clear as professional-grade audio productions.
However, depending on how much you need to alter the space, creating your DIY studio from scratch could be dangerous if you don’t bring in the right support. You’ll need to work closely with an electrician throughout the process to reduce the risk of fire and should have the risk assessed by folks who understand the importance of airflow and pollution.
This will keep you safe from harm while tracking live takes with bandmates or recording overdubs. A professional approach will increase the security of your DIY sound studio and minimize the risk of a break-in, too.
Electrical Hazards
Modern music studios are filled with expensive electrical and cutting-edge tech. This means that, when building your DIY music studio, you’ll need to install essential recording equipment like soundboards, digital audio workstations, and microphones.

However, if you’re planning to convert a spare room or garage into a home studio, you may need to rewire your home. This ensures you have enough outlets, can help prevent power surges, and will properly connect your control room to your tracking room. If you do decide to rewire your home, be sure to work with a professional electrician as common electrical hazards include:
- Residential Fire: A faulty switch or broken cable can lie dormant for weeks before causing a fire in your DIY studio.
- Shocks: High voltage shocks are extremely painful and can become lethal. That’s why professional electricians go through years of training to identify live wires and reduce risk.
- Inspection Failure: Your new home studio may look great, but failing to bring in a pro to install your electrics can result in an inspection failure when you decide to sell the house. This is a costly headache you want to avoid.
Working with a professional electrician may cost more upfront, but is sure to save you money in the long run. If you’re planning on DIYing your studio and do not have electrical experience, get in touch with a specialist who can do all the wiring and soldering for you. This will give you peace of mind and minimize the risk of your beautiful new studio going up in flames.
Air Flow
Prefabricated music studios are easy to assemble and offer rock-solid silence. This can make a world of difference if you’re used to having your band practices interrupted by nosey neighbors or frustrated family members. However, sealing the cracks around your space and adding mass to your walls can create air-flow issues. This can quickly become a health issue, as poor ventilation can lead to problems like mold growth, condensation, increased spread of respiratory infections, and poor air quality.
Finding a balance between sealing your site for soundproofing purposes and maintaining proper airflow can be tricky. That’s why it’s almost always best to work with a professional team when designing your sound isolation enclosure. They’ll make sure your room is up to specification and will offer solutions like ventilation systems and dead vents.
Resilient Spaces
Properly securing your new home studio deters burglars and keeps you safe while you record. This is crucial if you live in an area with high storm activity, as you’ll need to invest in tech to prevent storm damage if you want your studio to weather high winds and tornadoes. Today, many home improvement specialists offer products like storm-resistant doors and windows that can protect your studio from inclement weather and reduce the risk of debris destroying your workspace.
Taking a proactive approach to storm safety is particularly important if you’re converting an existing space, like a garage, into a DIY music studio. Retrofitting the shell of your studio with hurricane straps or hurricane ties ensures that the roof won’t blow off in high winds and can improve your entire home’s structural integrity if leveraged correctly.
Bringing in a professional to install these upgrades can increase the value of your home, too. A weather-resistant, professional-grade home music studio can be a real boon if you live in an area with high tornado activity or are seeing an uptick in high winds. Other musicians may pay a premium for your space when you try to sell, as they’ll see your high-quality space as a secure investment.
Conclusion
Taking your safety seriously is crucial when creating your DIY home studio. You cannot afford to make a mistake when installing electrical wiring and should consult with a professional when ventilating your space. This will improve the quality of your acoustics, reduce the risk of an accident, and help make the most of your space with peace of mind.
Cultivating Discipline and Focus in Music ProductionThey always say you can’t rush art, but dragging your feet and getting bogged down by distraction is a surefire way to end up with an unfinished project and a ton of stress when producing music. Whether you’re struggling with a lack of inspiration or can’t seem to bring your vision to fruition, task avoidance and subsequent delays in production can be avoided with a firm set of proactive solutions. Below, you will find a few ways to become more disciplined both in and out of the studio, increasing focus and leading to a final product you’re proud of.
Get Organized
Compartmentalization is essential for music production. Creating a schedule, setting goals for your day or week, and setting it up noticeably around your living space will keep your tasks front and center, reducing opportunities to slack. You don’t have to crown yourself with tasks to be disciplined either – checking off simple, but relevant items, like creating one beat each day or responding to inquiries, phone calls, and emails by noon will boost your sense of accomplishment. It will also inspire you to do more, making it easier to stick to your daily goals.
Process mapping is another way to organize and delegate tasks throughout the day to increase productivity. Since many people are primarily visual learners, it can be easier to stay on track by using a map outlined with shapes, symbols, colors, and directions. Keep things simple and leave room for deviation and redirection so you do not become overwhelmed by shame or self-doubt when your schedule for the day gets a bit off track.
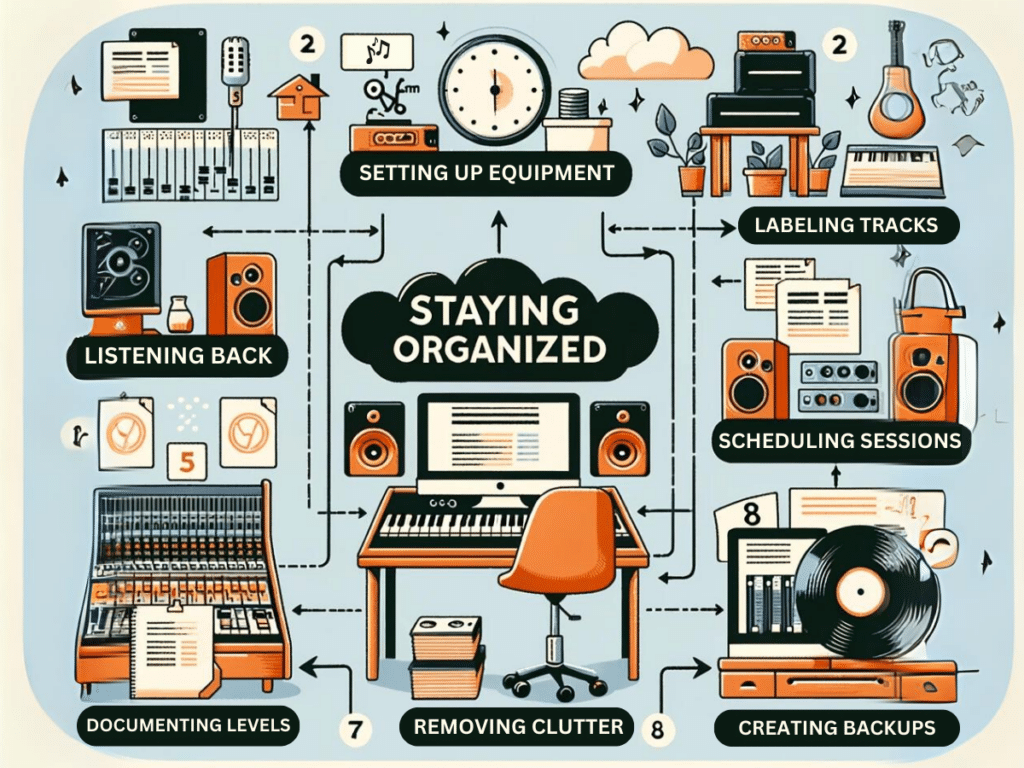
Decluttering your environment is also incredibly helpful. Clearing off your desk, removing trash, and creating a set area for everything in your space alleviates stress and confusion, giving you less reason to shut down and seek distractions. Do this routinely, ideally at the beginning or end of each day. You want to start the creative process in a clean space so feelings of discomfort or aggravation don’t cloud your mind.
Make Health and Wellness a Priority
It is almost impossible to work when you’re feeling mentally or physically unwell. As a music producer, you’re likely working long hours, often well into the night. Lack of sleep has a huge effect on your body – it creates brain fog, slows down your metabolism, increases blood pressure, and can lead to depression and anxiety. Make space for rest, even if you have to fit in a midday nap to feel refreshed.

Eating well is a major part of physical health that is often neglected by creatives. Spending hours at your desk can mean lengthy periods of snacking or skipping meals altogether, increasing fatigue among other common health issues. Replenish your body by consuming plenty of protein — at least 30 grams per meal — to feel properly satiated and energized throughout your day. Increase your water intake to 2.5 to 4 liters of water per day and decrease your sodium intake to less than 2,300 daily to prevent headaches, bloating, and other distracting physical discomforts.
Reduce Substance Dependence for Boosting Creativity
The music industry is saturated with substance abuse problems — a topic that is often glossed over and glamorized. Drugs and alcohol have been misconstrued as creativity-enhancing agents, lowering performance anxiety or providing artificial energy necessary to produce music quickly.
Though it’s easy to get lost in the idea that these substances improve your work, the reality of the matter is that drugs and alcohol simply affect your perception of your work. You may feel a sense of euphoria that makes you more satisfied with your latest studio session, something that tricks you into believing these substances are the key to incredible work.
At the end of the day, substance abuse is not the reason why your work is successful. Though drugs and alcohol may have been a source of inspiration for many creatives, they are not a cure-all for lack of discipline and being stuck in an artistic rut. Once the high wears off, you’ll be left with lasting mental health issues, impaired cognitive function, and addiction issues that can ruin your career.
Alcohol is one legal substance that can be quite easy to abuse and has some of the most debilitating effects on the mind and body. Long-term alcohol abuse depresses your central nervous system, manipulating your feelings in a way that will distract from the creative process. Other health issues include acid reflux, heart disease, immunodeficiency, and nutrient deficiencies that lead to reproductive troubles. If you are spending an excessive amount of time trying to repair these issues caused by drinking and substance abuse, you’ll have less time to work on improving your craft and completing projects.
Seek Inspiration
As mentioned previously, some creatives have found themselves depending heavily on drugs and alcohol to conjure inspiration for their work. In reality, there are so many other ways to get inspired that don’t include multiple cocktails and a medley of unprescribed medications.
One way is to eliminate all sources of excessive noise so you can truly be alone with your thoughts. Sometimes, the inspiration we’re looking for is within us, buried inside of our own experiences. Getting rid of noise, such as unnecessary people in the studio or background television, can really get the creative juices flowing and help you determine what the real source of inspiration you’re looking for is.
Another way to get inspired is by going to shows or connecting with other producers to gain some insight into their process. Examining success makes you want to be successful, and often what you need is to see someone else’s working method and environment so you can enhance your own.
You can also engage in artistic hobbies outside of music to get inspired. Write a story, paint on a canvas, or create a sculpture. Ultimately, your talent and artistry being applied to areas that come to you with ease can be just what you need to get motivated and become musically creative again.
The Power of Dialects and Accents in Voice Acting: Mastering VersatilityImagine the captivating world of cinema, where a single accent can transform an ordinary character into an unforgettable icon. Recall Meryl Streep’s masterful Polish accent in “Sophie’s Choice,” or the way Andy Serkis brought Gollum to life in “The Lord of the Rings” trilogy with a voice that was as unique as the character itself.
These examples underscore the profound impact that skillfully executed dialects and accents can have in the realm of acting. In voice acting, this impact is magnified, as the voice becomes the sole conveyor of the character’s identity and essence.
Mastering a variety of dialects and accents is akin to a musician fine-tuning their instrument. Each new style played adds depth and versatility to their repertoire. For voice actors, this mastery is not just an artistic endeavor; it’s a strategic career move. The ability to switch seamlessly between a sultry Southern drawl, a crisp British accent, or an authentic-sounding French lilt can open doors to diverse roles, spanning from animated films to video game characters, and everything in between.
In a recording booth, where every nuance and inflection is captured, the right accent can transform a performance from ordinary to extraordinary. It’s what distinguishes a memorable character from a forgettable one, resonating with audiences long after the story ends.
Your accent, whether for a gritty detective or a whimsical character, is a powerful tool in voice acting. It not only defines the character but also sets the tone and atmosphere of the entire narrative.
Mastering dialects and accents in voice acting is essential for achieving distinctiveness and range.
As we delve deeper into the art of mastering dialects and accents, remember that each voice you develop is a testament to your versatility and commitment to your craft. It’s about authentic characters and deep audience connections, helping you stand out in a sea of voices.
Understanding the Basics of Dialects and Accents
To truly grasp this concept in voice acting, one must first understand the subtle yet significant differences between a dialect and an accent.

Dialects
A dialect is not just a variation in pronunciation; it encompasses the unique vocabulary, grammar, and pronunciation specific to a region or group.
It’s the linguistic fingerprint of a community, shaped by cultural, geographical, and social factors.
Adopting a dialect means embodying someone’s life, complete with its unique nuances and idiosyncrasies.
Accents
On the other hand, an accent is a distinctive way of pronouncing a language, particularly one associated with a country, area, or social class. It’s less about the words you choose and more about how you say them. Accents are the melody of speech the unique musicality that differentiates a native New Yorker from a Londoner, even if they’re speaking the same language.
The key to mastering accents lies in the realm of phonetics, the study of the sounds of human speech. Phonetics dissects the intricacies of speech sounds, providing a roadmap for voice actors to navigate new accents. Three fundamental elements form the cornerstone of any accent: intonation, rhythm, and stress patterns.
Intonation
Intonation is the rise and fall of voice in speaking. It’s the difference between a question sounding inquisitive and a statement sounding assertive. Rhythm, on the other hand, is the pattern of sounds and silences in speech, the tempo at which words are spoken. It’s what makes the rapid-fire delivery of a New Yorker distinctly different from the more measured pace of a Southerner. Lastly, stress patterns – the emphasis placed on certain syllables within words and sentences – play a crucial role.
For a voice actor, this knowledge is power – the power to transform your voice into a versatile instrument capable of accurately and authentically representing diverse characters and cultures.
The Art of Learning New Accents
For voice actors, the path to accent acquisition is both thrilling and challenging. A practical starting point is to begin with accents that share similarities to your native dialect. This approach allows for a smoother transition, leveraging your existing linguistic framework to build confidence as you branch out into more diverse and complex accents.
Just as a sculptor needs to understand their medium, a voice actor must become intimately familiar with the nuances of the accent they wish to master. This immersion can be achieved through a variety of methods. One effective approach is to mimic accents in films, television shows, and theater performances. Pay close attention not just to the sounds, but also to the rhythm, intonation, and emotional undertones carried by the accent.
Accent training websites and software can also be useful resources, offering structured lessons and exercises tailored to specific accents. These tools often provide detailed breakdowns of phonetic components, making it easier to understand and replicate the sounds accurately.
How to Practice an Accent
However, the true essence of mastering an accent lies in consistent practice. Regular, dedicated practice sessions are crucial. This is not just about repeating sounds, but about speaking with the accent in different contexts – from reading aloud to normal conversation. This kind of practice helps internalize the accent, making it a natural part of the vocal repertoire.
Recording oneself is another vital aspect of the learning process. Often, what we perceive in our heads differs from what others hear. By recording and listening to your attempts, you can objectively assess your accent imitation. This self-evaluation allows you to identify areas of strength and those needing improvement. It’s a feedback loop that accelerates your learning and hones your skills.
Remember, acquiring a new accent is not just about altering your speech. It’s about embracing and understanding a new culture and way of expression. Each accent carries with it a history, a set of experiences, and emotional depth. As a voice actor, your goal is to capture not just the sound of the accent, but its soul.
Challenges and Common Mistakes in Accent Performance
Mastering an accent is a delicate balance between authenticity and performance. In this intricate dance, even seasoned voice actors can stumble, often falling prey to common pitfalls. One of the most frequent mistakes is over-exaggerating.
In an earnest attempt to sound authentic, actors sometimes push the accent too far, resulting in a caricature rather than a character. This overreach not only detracts from the performance but can also inadvertently offend or misrepresent the people and culture associated with the accent.
Another challenge lies in the realm of stereotypes. Relying on cliched or outdated perceptions of how an accent should sound can lead to performances that are at best unconvincing and at worst, culturally insensitive. Accents are not static; they evolve and vary widely even within the same geographical area. What might be a common intonation in one part of London, for instance, could be entirely different in another.
The Key to Avoiding Accent Pitfalls
Studying native speakers is invaluable. This doesn’t just mean listening to them but observing the nuances of their speech in different contexts – casual conversation, emotional dialogue, formal speech, and so on. The goal is to understand the accent in its natural habitat, rather than just its exaggerated form often portrayed in media.
Feedback is equally crucial. Working with a dialect coach can provide professional guidance and help you navigate the subtleties of the accent. If a dialect coach isn’t accessible, seeking feedback from native speakers can be incredibly beneficial. They can offer insights that you might have overlooked and help you fine-tune your performance to achieve a level of authenticity that resonates with listeners.
Remember, the objective is not just to mimic an accent but to inhabit it. This requires a blend of technical skills, cultural understanding, and emotional empathy. By avoiding over-exaggeration and stereotypes, and seeking informed feedback, you can improve your accent performance from mere imitation to a genuine and respectful portrayal.
Accent and Dialect Resources for Voice Actors
In the quest to master dialects and accents in voice acting, an array of resources is available to voice actors. These tools range from websites and online courses to specialized books and apps, each offering unique approaches to accent training. Additionally, workshops and coaching services provide personalized guidance, helping actors refine their skills under expert supervision. Here, we compile a list of the most valuable resources available to assist you in your accent and dialect journey.
1. Websites and Online Courses
- IDEA (International Dialects of English Archive): A free online resource that provides a wealth of recordings from native speakers around the world. It’s an excellent starting point for understanding the authentic sound of different accents.
- AccentHelp: For those looking for comprehensive guidance, AccentHelp offers detailed courses for learning various accents, complete with extensive audio examples and written materials.
2. Books and Guides
- “Accents: A Manual for Actors” by Robert Blumenfeld: This book is a treasure trove for actors, offering practical advice on how to learn and perform a wide range of dialects.

- “Speaking with Skill” by Dudley Knight: A more in-depth exploration of the technical aspects of speech and accent acquisition, ideal for those looking to deepen their understanding of phonetics.
3. Apps
- The Accent Kit: A handy tool for on-the-go practice, this app offers interactive learning experiences for a variety of accents.
- Forvo: This pronunciation guide app provides real-life examples of how words are pronounced by native speakers in different languages and accents.
4. Workshops and Coaching
- Knight-Thompson Speechwork: Offering workshops and intensive courses, this organization focuses on practical skills for speech and accent training.
- Voice and Speech Trainers Association (VASTA): VASTA hosts events and workshops, providing opportunities to learn from experienced coaches in the field of voice and speech.
5. Online Communities and Forums:
- Engaging with online communities, such as those on Reddit or specialized voice-acting forums, can also be beneficial. Here, you can find advice, practice partners, and feedback from fellow voice actors.
Each of these resources offers a unique approach to learning and mastering accents and dialects. While books and guides provide the theoretical foundation, websites, apps, and workshops offer practical, hands-on experience. The key is to find the combination of resources that best suits your learning style and needs.
The Ethical Considerations of Performing Accents
When delving into dialects and accents in voice acting, voice actors must tread with both skill and sensitivity. The act of adopting an accent is not merely a technical challenge; it carries the weight of cultural representation. When you speak in an accent not your own, you are, in a sense, stepping into the shoes of another culture or ethnicity. This responsibility should be approached with the utmost respect and mindfulness.

The importance of cultural sensitivity cannot be overstated. Accents are more than just sounds; they are deeply intertwined with cultural identities and histories. An uninformed or careless portrayal can inadvertently perpetuate stereotypes, offend, or misrepresent the people behind the accent. As voice actors, it’s crucial to remember that your performance has the power to influence perceptions and reinforce narratives about different cultures and communities.
To approach accents with the respect they deserve, thorough research and understanding are essential. This goes beyond just mastering the sound of the accent. It involves an appreciation of the context from which it originates.
Learn more about the culture, the people, and their history. Understand the nuances and variations within the accent, as no two speakers are exactly alike. This depth of knowledge not only enriches your performance but also ensures that it is grounded in authenticity and respect.
Guidelines to Help Navigate the Ethical Landscape of Performing Accents
Do Your Research: Invest time in understanding the background and nuances of the accent. This includes its geographical origins, cultural significance, and contemporary usage.
Seek Authentic Sources: Learn from native speakers and dialect coaches who can provide insights into the accent’s subtleties and variations.
Avoid Stereotyping: Steer clear of broad generalizations and caricatures. Focus on creating a character that is individual and nuanced, not a collection of exaggerated traits.
Be Open to Feedback: Be willing to listen to and learn from feedback, especially from members of the culture you are representing. Their insights can help you create an accurate and respectful portrayal.
Practice Cultural Empathy: Strive to understand and appreciate the culture associated with the accent. This empathy will inform your performance and help you avoid disrespectful or insensitive portrayals.
By following these principles, voice actors can navigate the complex and rewarding world of accents with both professionalism and ethical integrity.
The Enduring Value of Diverse Voices
As we draw our exploration of dialects and accents in voice acting to a close, it’s clear that these elements are far more than mere tools of the trade. They are the vibrant colors with which voice actors paint their characters, bringing authenticity and diversity to the canvas of storytelling. Mastering various accents and dialects showcases an actor’s versatility and celebrates the richness of language and culture.
The journey of mastering accents is an ongoing process, one that challenges and enriches a voice actor’s craft. It’s a path that demands dedication, curiosity, and respect. As you embark on this journey, remember that each new accent you learn opens a window into a different world. It’s an opportunity to connect with and understand the subtleties of various cultures and communities, deepening your appreciation for the nuances that make each language unique.
Learn with an open mind. Let your pursuit of accent mastery be guided not just by the desire to expand your skill set, but also by a genuine interest in the stories and experiences behind these voices.
Final Thoughts
The mastery of dialects and accents in voice acting is more than just an impressive display of vocal agility. It’s a powerful means of storytelling, a way to give voice to the voiceless and to bring life to characters that might otherwise remain unheard. As voice actors, you have the unique privilege and responsibility of bringing these diverse voices to the forefront.
So, continue to hone your craft, explore new accents, and cherish the journey. The voices you create today are the echoes that will resonate in the hearts and minds of your audience, leaving a lasting impact that transcends the boundaries of language and culture.
Rock Solid Silence: The Art of Garage Studio SoundproofingAs a musician, it can get tiring when you are constantly having to turn down your music or being shushed by annoyed family members or neighbors. It can also be frustrating trying to find a space where you can fully unleash your creativity and practice without the fear of bothering others.
Thankfully, with careful planning and noise-canceling techniques, you can create your very own garage studio where you can rock out to your heart’s content without disturbing the peace. In this article, we will guide you through the process of making your garage into a semi-soundproof music sanctuary.
Preparing for Your Garage Studio Makeover
Before diving into soundproofing, it’s essential to prepare your garage for its transformation. This includes decluttering, organizing, and purging any unnecessary items to make room for your studio equipment.
Building a complete studio can get expensive, so to keep costs down for your studio, consider repurposing furniture or buying secondhand from online marketplaces. Once you have cleared out the area, take note of any potential noise leaks, such as gaps around windows or doors. These will need to be addressed during the renovation process.
Finally, before you start renovating, you must understand the difference between sound treatment and soundproofing. This can help you take the proper steps toward creating a quiet and controlled environment for your music without wasting time or money on the wrong materials or techniques.
Soundproofing Your Garage Studio
Now that you have prepared your space and know more about the process, it’s time to start soundproofing the garage. Here are some critical steps to follow:
1. Seal any potential noise leaks:
As mentioned above, seal gaps or openings in your area to keep the sound in or out. You can easily do this using weather striping, caulk, or acoustic sealant available at your local hardware store.
2. Insulate your walls:
Insulation is crucial for creating a noise-absorbent barrier in your music space. Make sure to use a dense material like rock wool or fiberglass insulation to absorb and reduce sound transmission. Try to insulate all the walls, including the ceiling, if possible.
3. Add mass to your walls:
Adding some thickness to your walls is another way to reduce audio transmission. This can be done by putting up foam panels and adding extra layers of plasterboard. These techniques can help dampen and absorb sound waves.
4. Seal your windows and doors:
Windows and doors are often the culprits when it comes to noise leaks. To tackle this, add a second layer of glazing to your windows using audio-absorbing materials like laminated glass or plexiglass. As for doors, simply attach a door sweep at the bottom and weather stripping around the edges.
5. Invest in acoustic panels:
Acoustic panels are perfect for controlling sound reflections within your studio. Place them strategically on your walls to reduce echo and enhance the overall audio quality of your recordings.
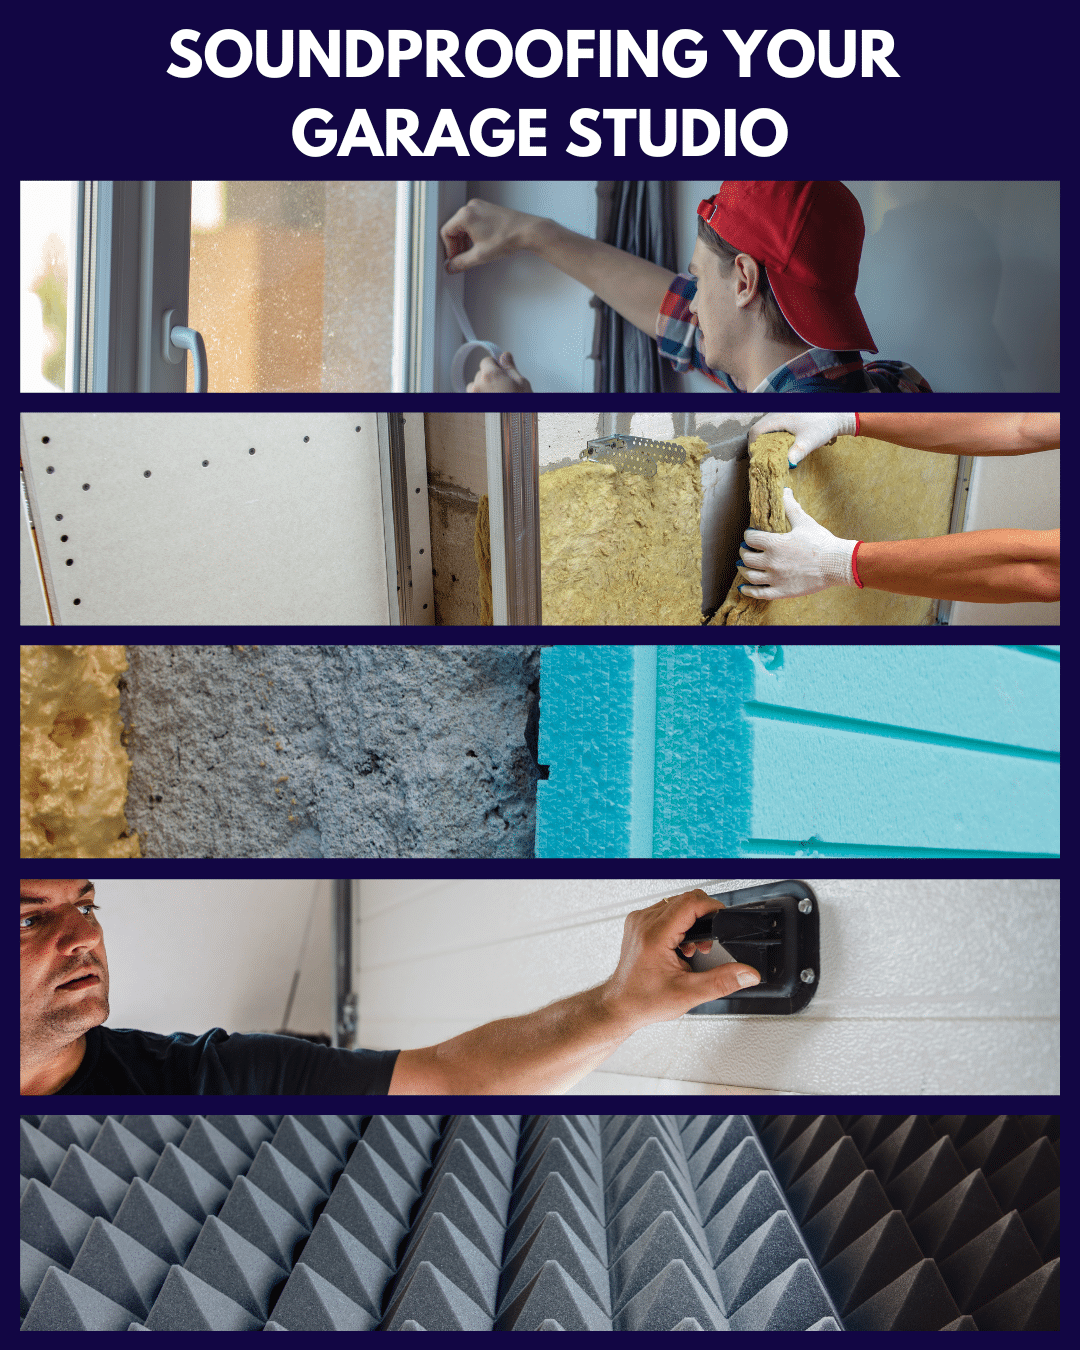
Taking these measures will significantly improve the acoustics in your garage, creating a more balanced and noise-free environment for you to practice and record audio. This can also be a benefit if you are living with roommates, as having a soundproof area for your recording is a way to respect one another’s privacy and prevent noise disturbances from affecting those you are living with.
Additional Techniques for a Soundproof Garage Studio
Although the above steps will reduce some noise levels, there are more tips you can follow to improve the soundproofing of your garage studio further. Here are a few to consider:
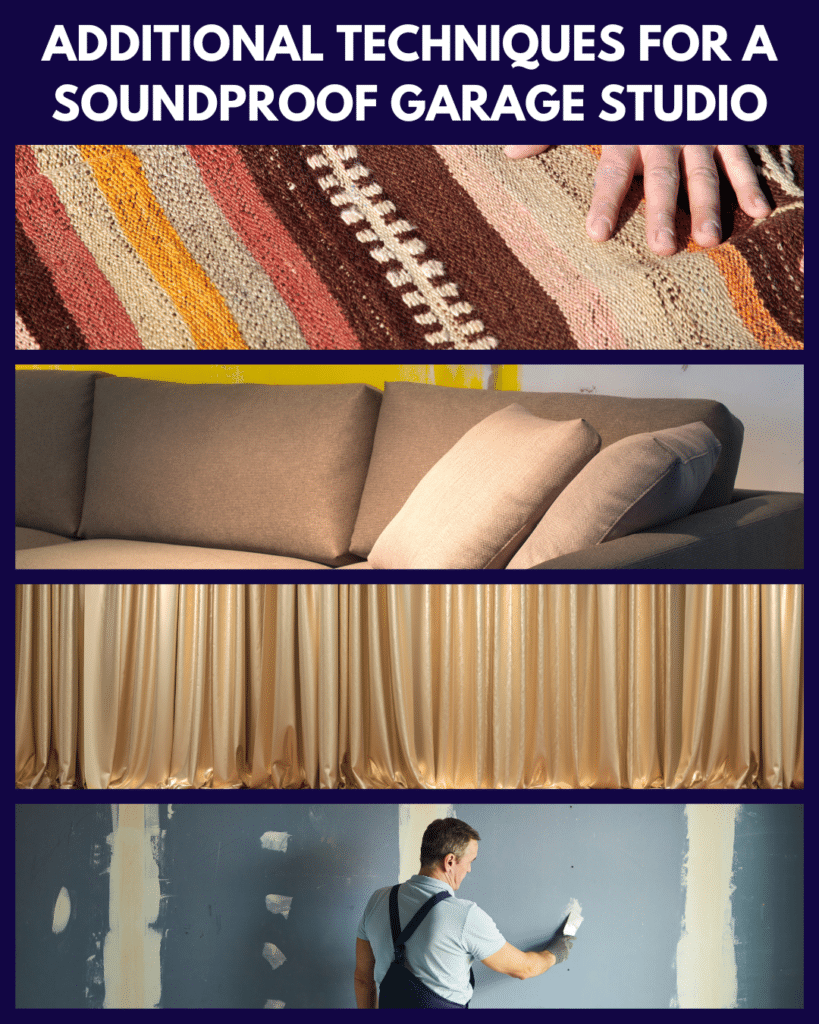
1. Mind the flooring:
Surfaces like concrete and tile can amplify sounds, so consider throwing some rugs or carpet on your garage floor to soak up any unwanted noises.
2. Use furniture as buffers:
Furniture pieces like bookshelves, cabinets, and sofas can also double as barriers to help reduce sound transmission.
3. Decorate your walls:
Hanging some tapestries or curtains on your walls can also help absorb sound waves and add a touch of personality to your studio.
4. Experiment with different materials:
Every space and situation is unique, so don’t be afraid to try other materials and techniques to find what works best for your garage studio.
Remember, soundproofing is not an exact science, and finding the best strategy to suit your specific needs and budget may take some time.
Benefits of Soundproofing Your Garage Studio
A soundproof garage studio offers many benefits, not just for you but also for those living around you. Here are some reasons why investing in noise-canceling is worth it:
1. Increased property value:
These changes can add value to your property, especially for potential buyers who are musicians or looking for a quiet space to work from home.
2. Preserving peace and relationships:
By creating an audio barrier, you will be able to practice and record without annoying your family members or neighbors. This can help protect the quiet and maintain positive relationships with everyone.
3. Better audio quality:
Noise-canceling blocks external noises and improves the overall audio quality within the studio. Which means better recordings and a more enjoyable music-making experience.
4. An affordable way to improve your music:
Building a brand-new studio from the ground up can be expensive. So, doing a DIY project and using used or recycled materials could be an affordable way to improve the acoustics in your garage without going over budget.

With some careful considerations, budget-friendly solutions, and enough knowledge about sound treatment and soundproofing, you can transform your space into the perfect studio. Remember to consider the benefits for both yourself and those around you, and enjoy being able to make music without limitation.
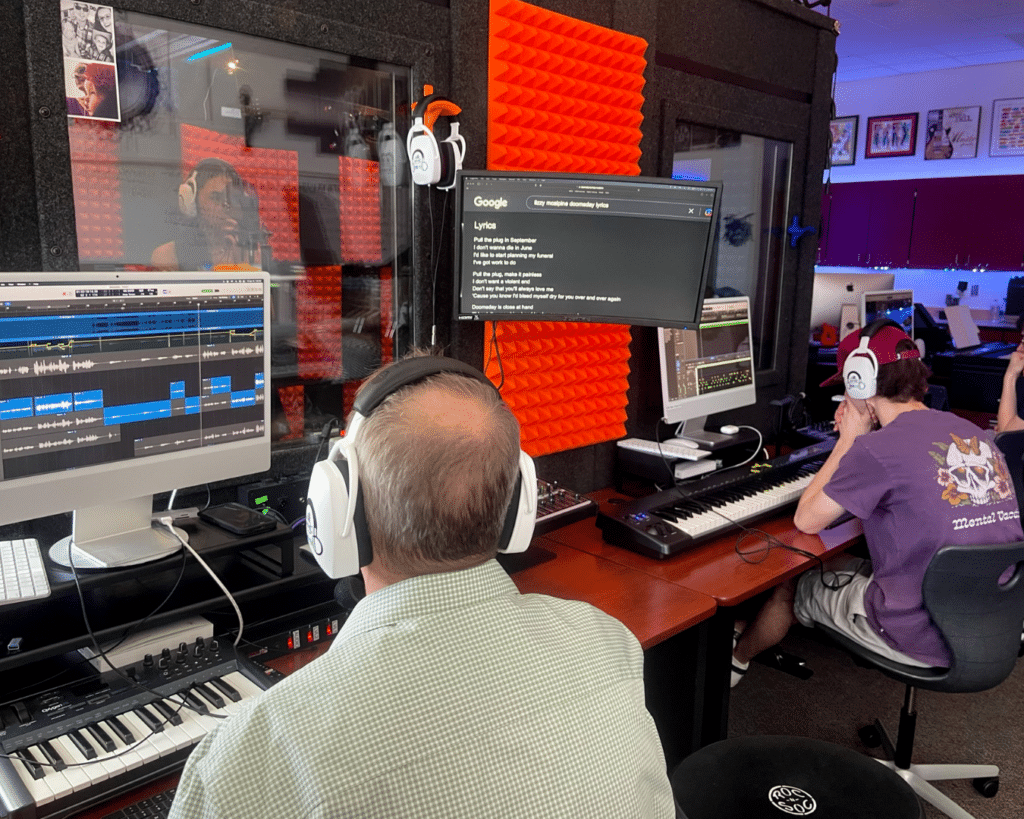
Transforming Sound Isolation in Education and BeyondIn the world of audio and sound, clarity and quiet are king. Enter WhisperRoom, the versatile solution designed to meet a wide array of sound isolation needs. From music schools to private studio areas in libraries, WhisperRoom offers a sanctuary for sound. Ideal for recording, practicing, or any activity where sound isolation is key, our booths provide a customizable, sound-controlled environment.
Challenges in Traditional Music Programs
Traditional music programs, whether in schools, colleges, or community centers, often grapple with a set of common, yet daunting challenges. Space constraints are a frequent issue, especially in urban settings where every square foot counts. Additionally, the inherent nature of music education – with multiple instruments and voices in use simultaneously – can lead to significant noise issues. This not only affects the quality of learning for students but can also be a source of disturbance to others in the vicinity. The need for a solution that addresses these challenges effectively is not just a luxury, it’s a necessity.
WhisperRoom Solutions
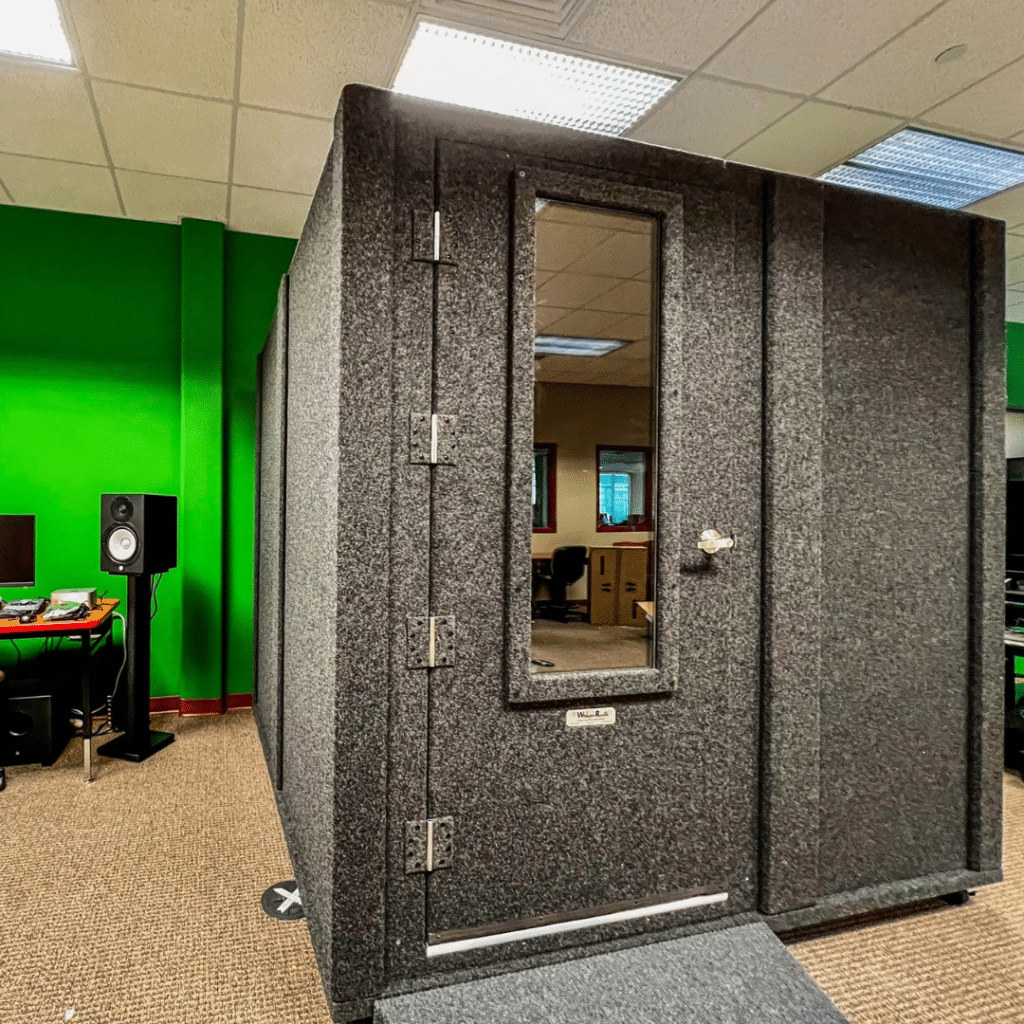
This is where WhisperRoom steps in as a game-changer. By offering sound isolation booths in a variety of sizes, WhisperRoom tackles the issue of space constraints head-on. You can install these booths in existing spaces, transforming even small or underutilized areas into effective practice or recording areas.
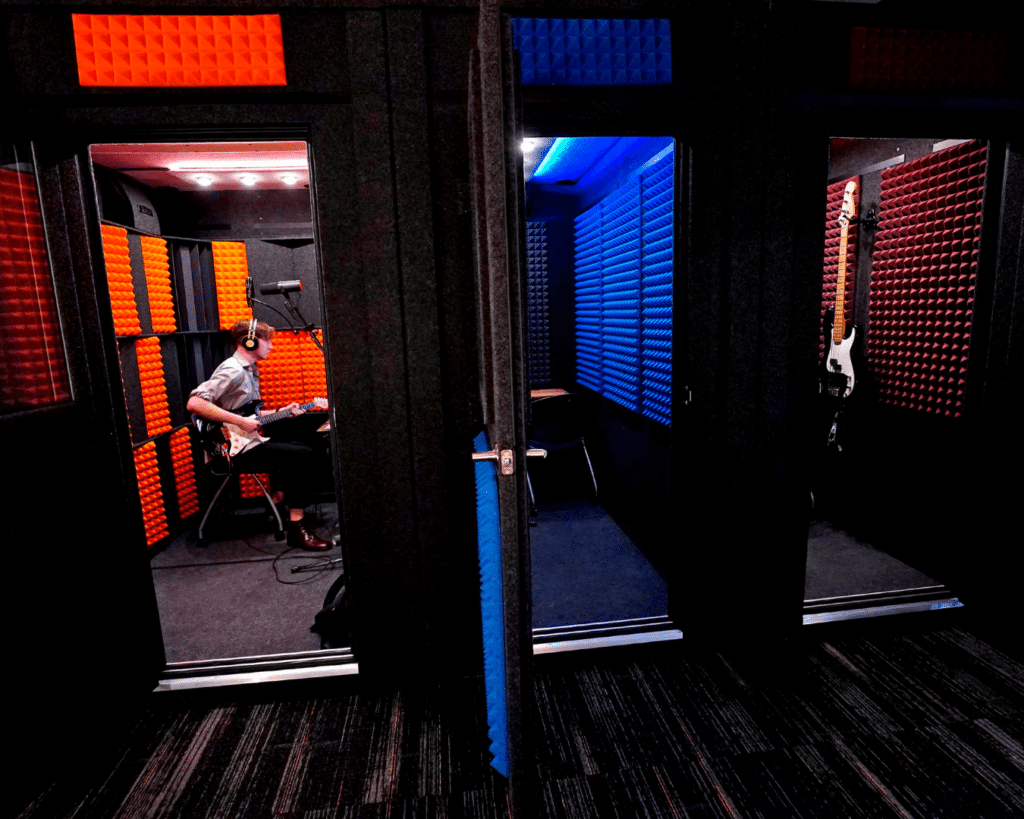
More importantly, the sound isolation capabilities of WhisperRooms allow for the simultaneous use of multiple booths near each other without sound interference. This dramatically improves the learning environment, allowing students to practice or record without external noise distractions and without disturbing others. The result is a more focused, efficient, and enjoyable learning experience.
Beyond Music Education
The utility of a WhisperRoom extends well beyond the realm of music education. In the world of audio post-production, for instance, the controlled sound environment provided by WhisperRoom is invaluable. It allows for clear, precise editing and mixing, free from external noise interference.
Libraries can also benefit greatly from adding a WhisperRoom to their space. In these traditionally quiet spaces, WhisperRooms can serve as private study or research areas, or even as spaces for digital content creation, such as podcasting or vlogging. The versatility of a WhisperRoom makes it an ideal solution for a variety of settings where you desire sound isolation or control.
26 Sound Booth Sizes
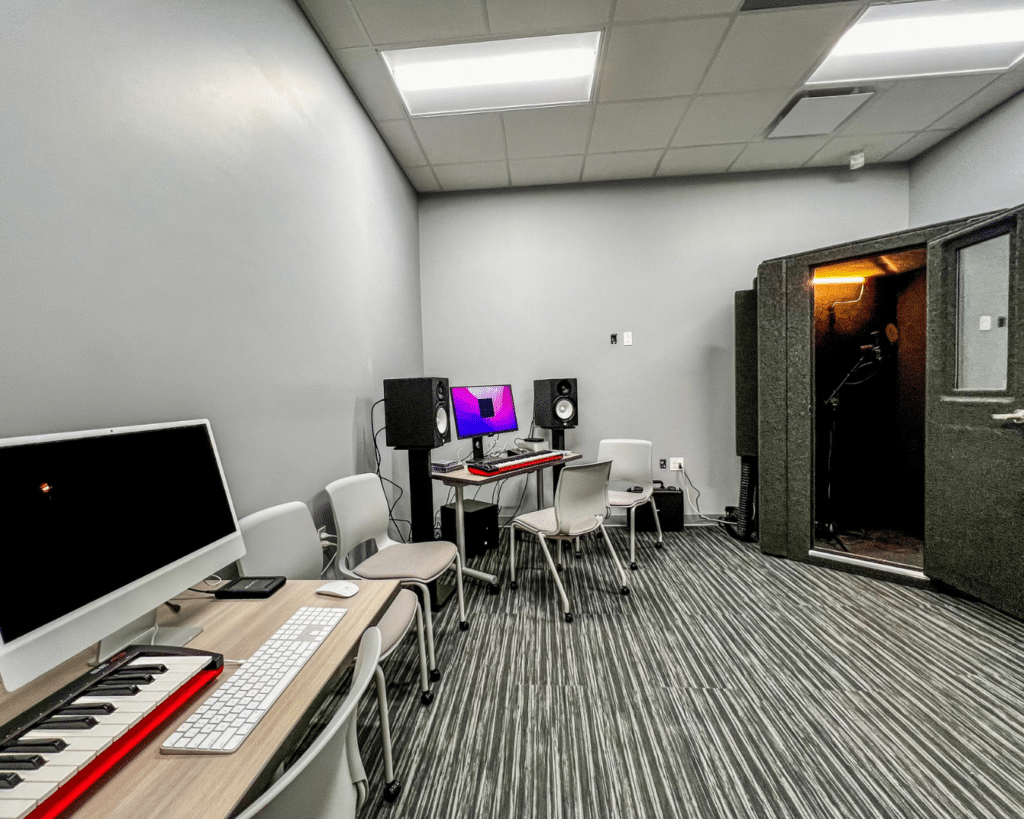
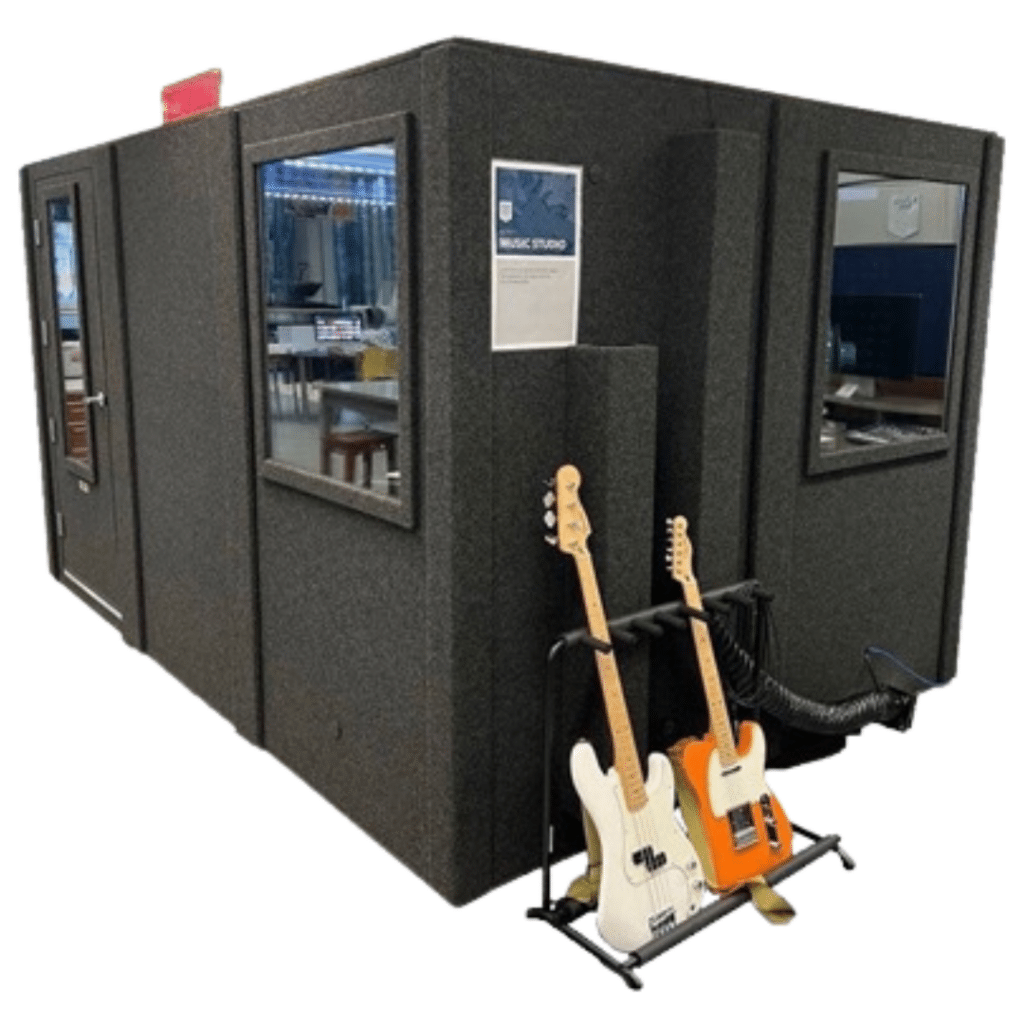
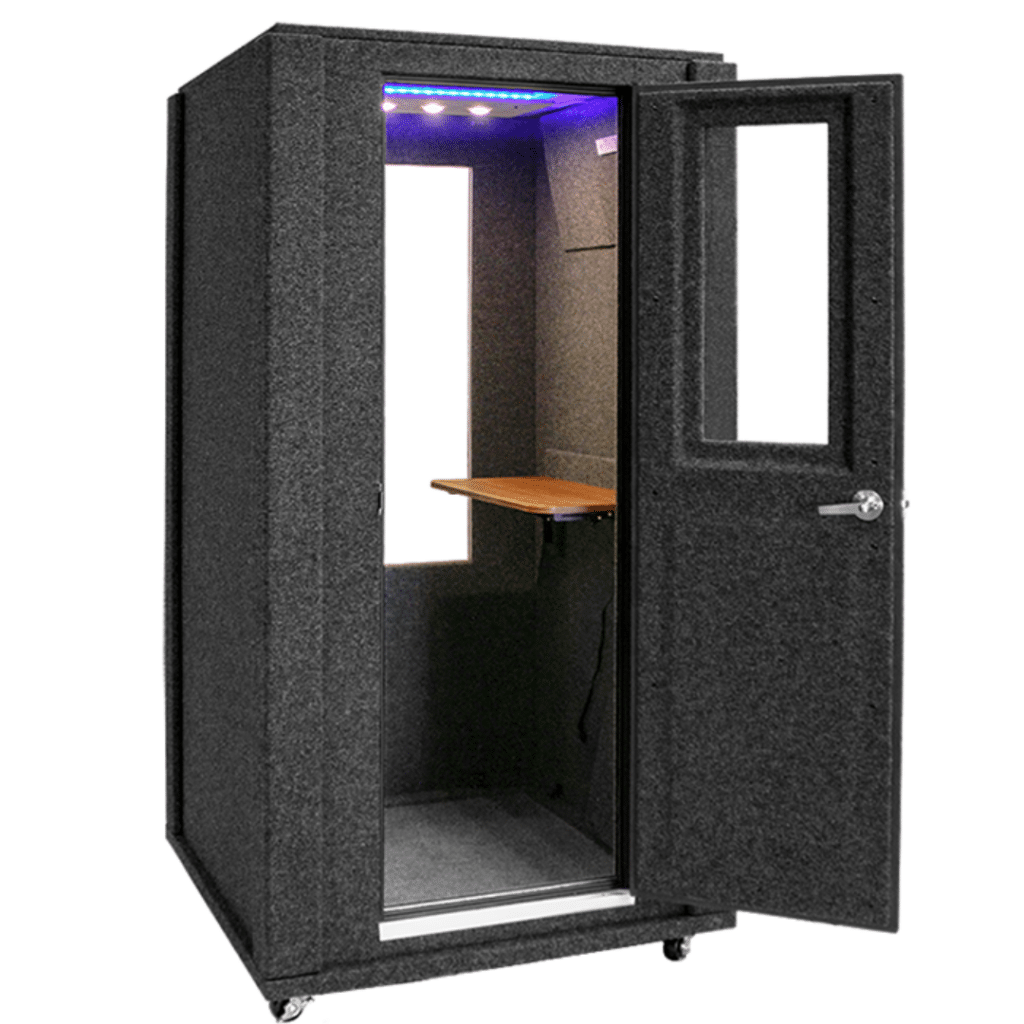
Our range of 26 different sound booth sizes vividly reflects our commitment to versatility and customization. This extensive selection caters to a wide spectrum of needs and spaces, ranging from compact single-person booths to larger configurations designed for group activities.
The smaller booths are perfect for individual practice sessions, vocal recordings, or podcasting, fitting snugly even in limited spaces like small music classrooms. On the other end of the spectrum, the larger booths offer enough space for ensemble rehearsals, group recordings, or collaborative projects, making them ideal for music schools, professional studios, and community centers. This diversity in size ensures that there is a WhisperRoom solution for virtually every need and setting.
Two Levels of Isolation
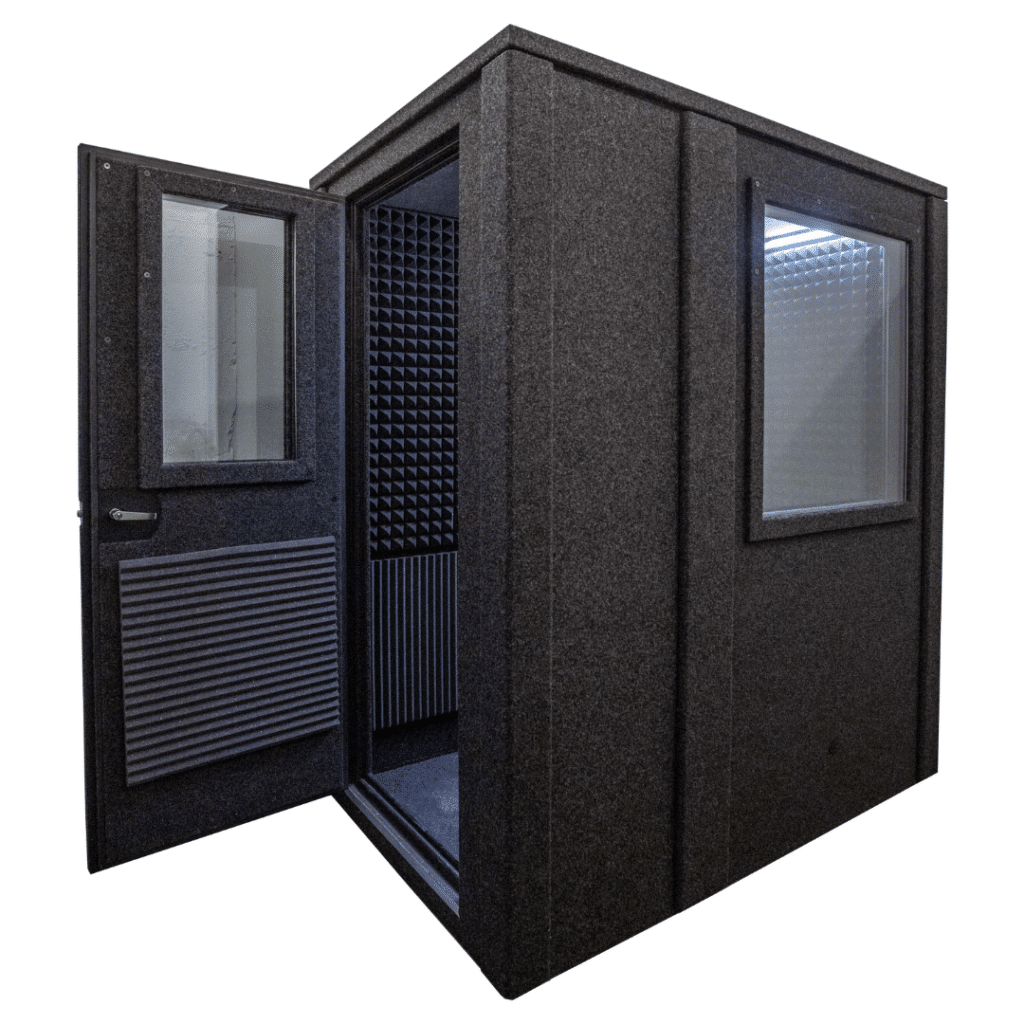
WhisperRoom’s innovative design comes in two distinct levels of sound isolation, catering to a diverse range of needs and environments.
The Standard (single-wall isolation) model offers a significant reduction in sound transmission, making it an ideal choice for general practice sessions, music lessons, or any activity where a basic level of sound control is beneficial. It’s particularly suited for environments where moderate sound reduction is sufficient, such as in educational settings or private studios.

On the other hand, the Enhanced (double-wall isolation) model takes sound isolation to the next level. The double-wall construction of this model specifically caters to scenarios where superior sound isolation is crucial. This model excellently fits professional recording, detailed audio editing, or any situation that requires minimizing external noise interference to the greatest extent possible. Professional recording studios, research facilities, and high-end music education programs, where pristine sound quality is non-negotiable, particularly favor this model.

Upgrade possibility
One of the most appealing aspects of WhisperRoom’s design is its adaptability. Recognizing that needs can evolve, WhisperRoom offers the flexibility to upgrade from the Standard to the Enhanced model. This feature is particularly beneficial for users who may initially require a basic level of sound isolation but anticipate a future need for more advanced sound control.
The design of the upgrade process is seamless, allowing users to enhance their sound isolation capabilities without investing in an entirely new booth. This adaptability makes WhisperRoom a future-proof investment in sound isolation.
Optional Features
WhisperRoom’s commitment to providing tailored sound isolation solutions is evident in our extensive range of over a dozen customizable features. We design each feature to enhance the functionality and user experience of the booths. Among these options, certain features stand out for their popularity and relevance in educational and professional musical environments.
ADA Package
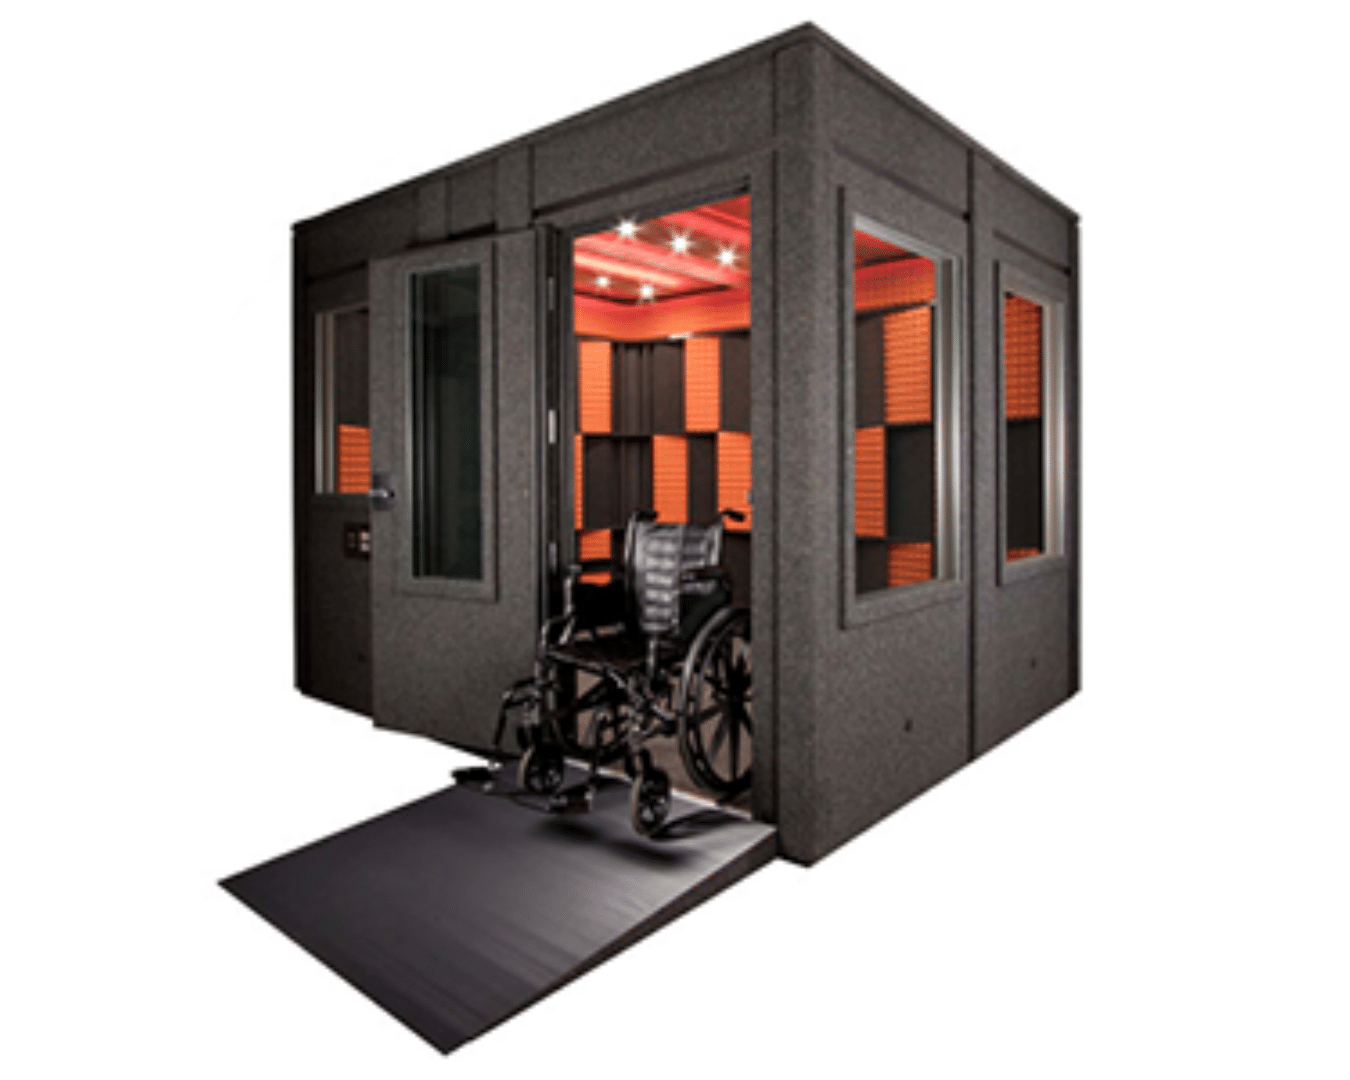
Inclusivity and accessibility are at the forefront of WhisperRoom’s design philosophy, embodied in the optional ADA (Americans with Disabilities Act) Package. This feature is crucial so the WhisperRoom can be accessible to users with disabilities, making it a versatile choice for public institutions like schools and libraries, as well as private studios committed to inclusivity. The ADA Package includes a wide-access door, a ramp, and an elevated interior floor to provide a no-threshold entrance. This package allows every individual, regardless of mobility or physical ability, to utilize the space
Acoustic Treatment
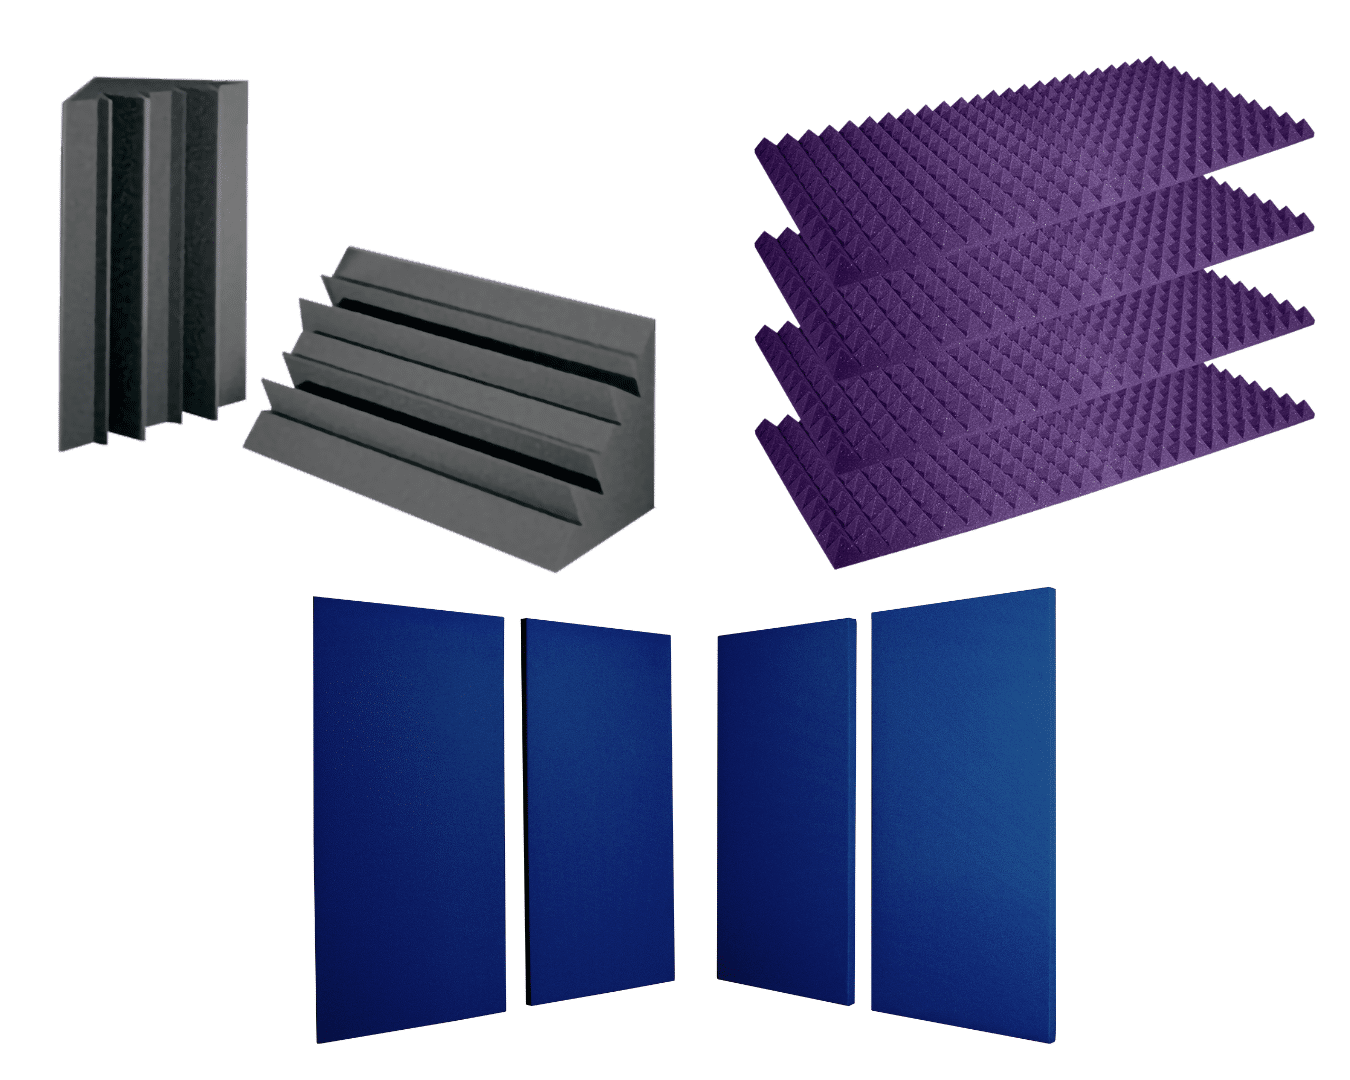
Sound quality is paramount in a sound isolation booth, and WhisperRoom offers a variety of treatment options. These treatments fine-tune the acoustics within the booth, reducing reverberation and controlling sound reflections. This results in a clearer, more precise sound environment, which is essential for activities like recording, broadcasting, or critical listening. Whether it’s for a budding musician perfecting their craft or a professional producing high-quality recordings, the acoustical treatment options shape the sound within a WhisperRoom to meet the highest standards.
Wall Windows and Height Extension
WhisperRoom’s optional features address additional aspects of visibility and spaciousness. You can incorporate wall windows to create a more open, less claustrophobic environment and allow for visual communication between the booth user and those outside. These features are particularly beneficial in educational settings or recording studios where visual cues are an integral part of the process. Additionally, the option for height extension is available, providing extra headroom which is especially useful for activities that require standing, such as playing certain instruments or conducting standing vocal performances. These options add an extra layer of comfort and functionality to the WhisperRoom, making it an even more adaptable solution for a wide range of uses.
Ventilation
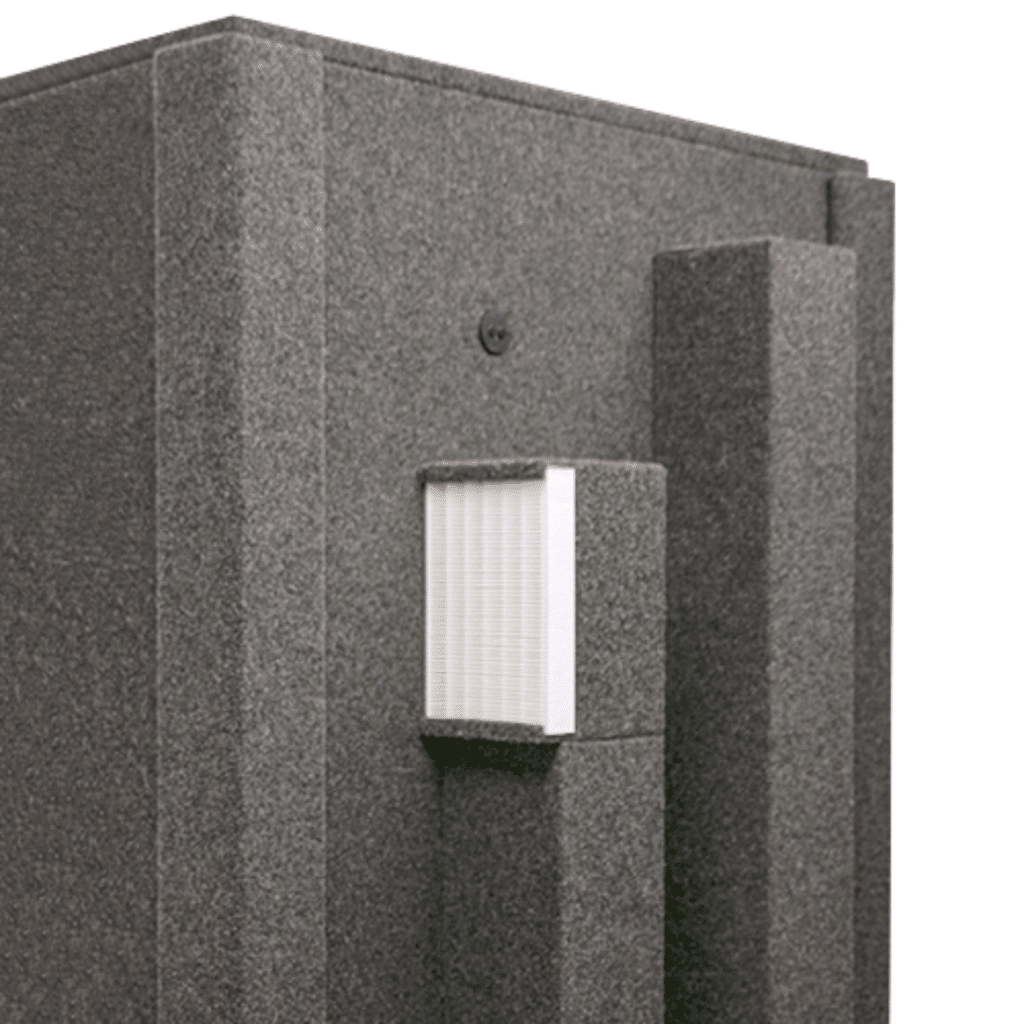
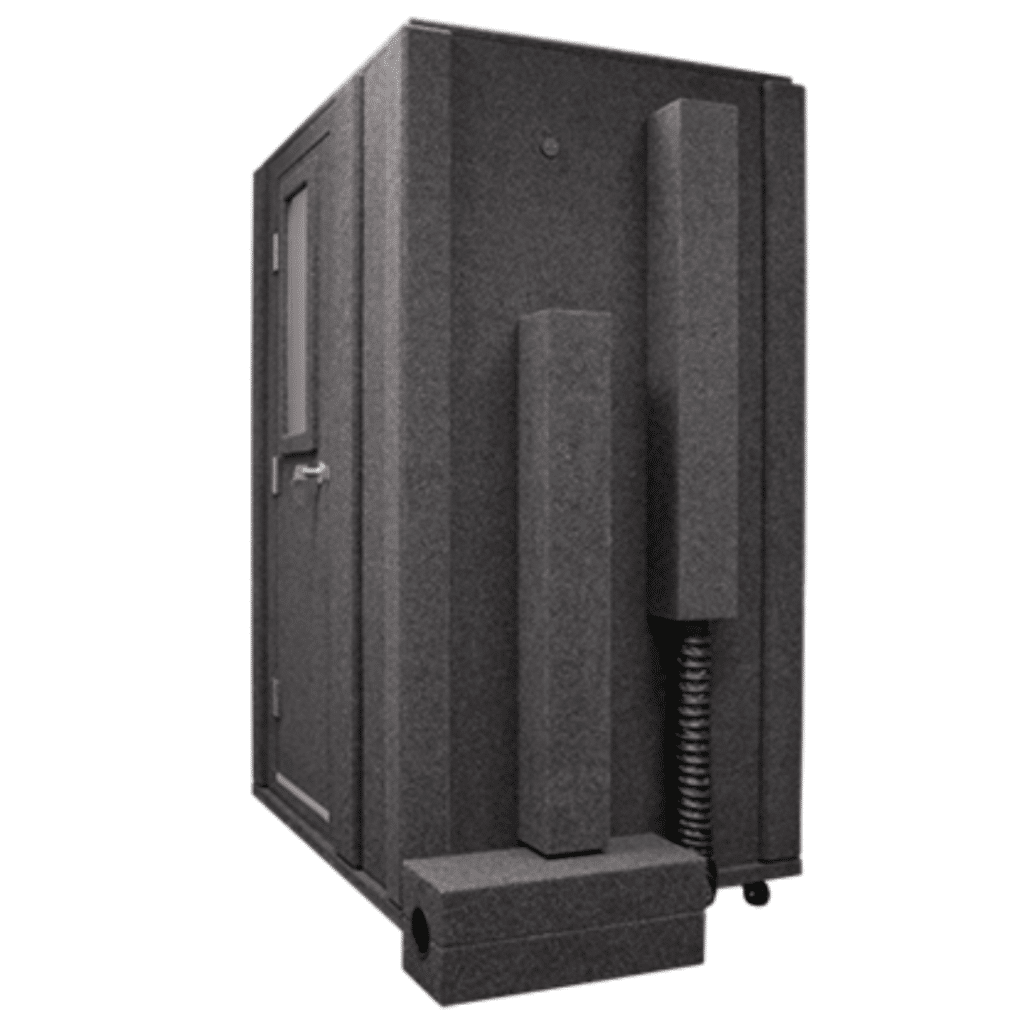
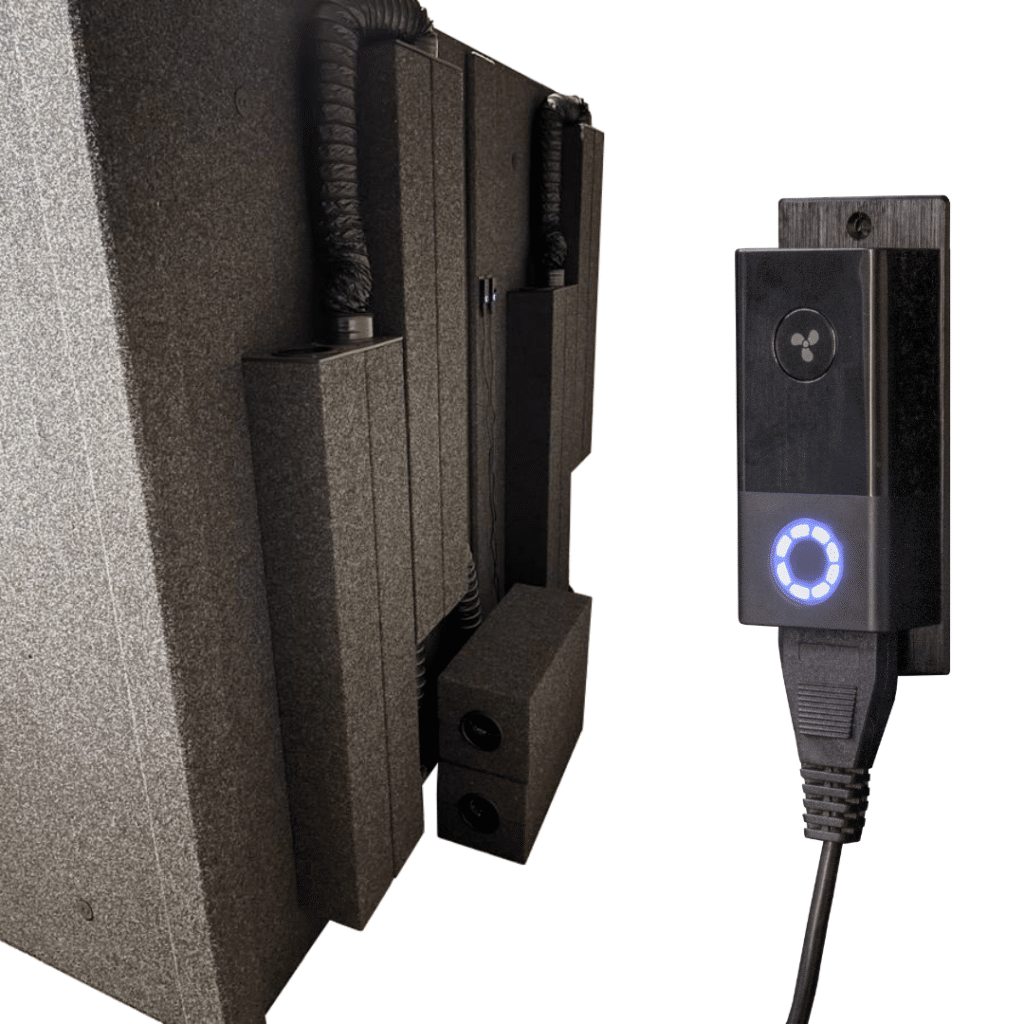
A thoughtfully designed ventilation system, a key component of the WhisperRoom experience, creates a comfortable and safe environment for extended use. This ingeniously crafted system maintains a steady flow of fresh air, crucial for both comfort and concentration during long sessions.
The booth pulls in fresh air from the bottom and efficiently expels warm air from the top, creating a continuous cycle of air circulation. This design not only keeps the air inside the booth fresh but also helps maintain a consistent temperature, making it comfortable for users even during prolonged periods of use. The system operates quietly and does not compromise sound isolation.
Ventilation Add-Ons
Recognizing the diverse needs of our users, WhisperRoom offers additional ventilation options to further enhance the air quality and comfort inside the booths. One such option is the integration of HEPA filters, which are particularly beneficial in settings where air purity is paramount, such as in sensitive recording environments or locations with an amount of dust or allergens. These filters keep the air inside the booth clean and healthy, providing peace of mind for users with allergies or respiratory concerns.
Another add-on is the roof-mounted ventilation system, which offers an alternative setup for air circulation. This option can be particularly useful in scenarios where space constraints require a different approach to air management. Both of these add-ons underscore WhisperRoom’s commitment to creating a comfortable, healthy, and adaptable environment for all its users.
The WhisperRoom Advantage
When considering sound isolation solutions, the cost is a significant factor, and here, WhisperRoom presents a compelling advantage over traditional buildouts. Soundproofing construction can be prohibitively expensive, often involving extensive renovations, permanent structural changes, and significant material costs.
In contrast, WhisperRoom offers a cost-effective alternative. The modular design of these booths allows for installation in existing spaces without the need for costly construction work. This not only makes WhisperRoom a more budget-friendly option upfront but also reduces long-term costs associated with permanent structural changes, such as increased property taxes or higher insurance rates.
Ease of Assembly and Relocation
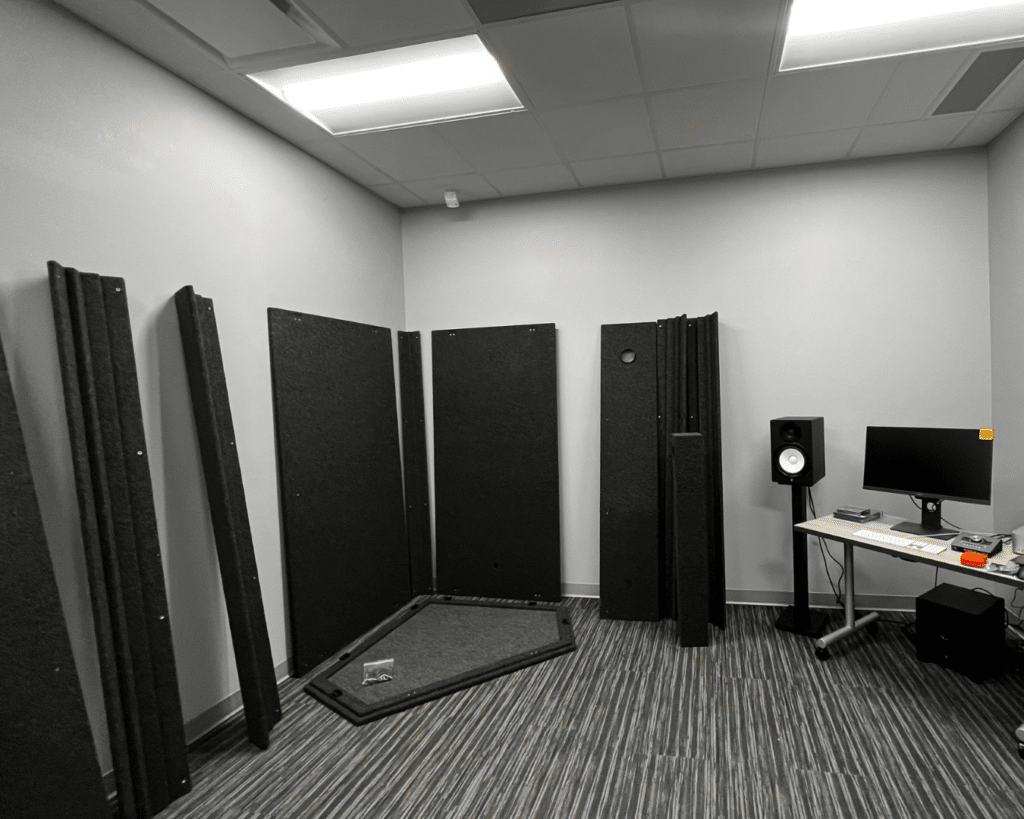
Another key advantage of WhisperRoom is its ease of assembly and the potential for relocation. Designed for relative ease of assembly, WhisperRooms require minimal tools and no specialized construction skills, unlike permanent constructions. This DIY-friendly approach saves on installation costs and time.
Furthermore, the modular nature of these booths allows for their disassembly and relocation as needed. This flexibility is invaluable for institutions that change layout or location, as it allows them to adapt their sound isolation solutions without additional major investments.
Improved Learning Environment
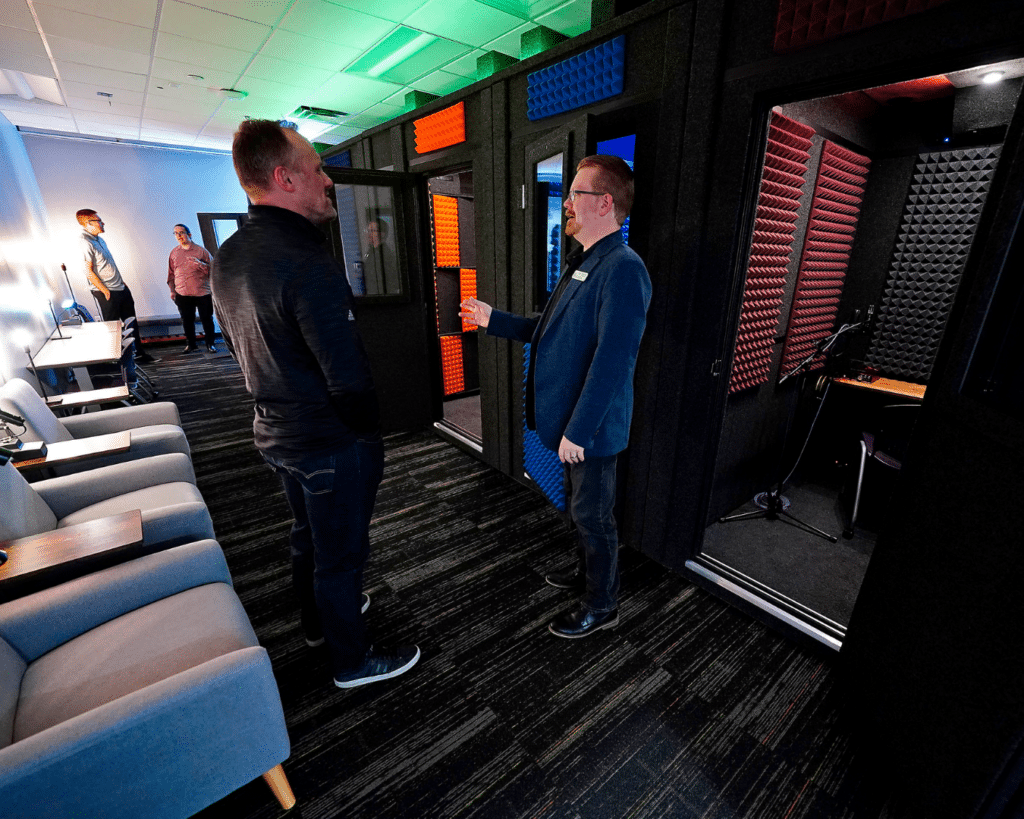
In educational settings, WhisperRoom has a profound impact on the learning environment. The sound isolation it provides creates a focused and distraction-free space, essential for effective learning and practice in music education. Students can practice or record without fearing to disturb others, and likewise, external noises do not distract them.
This level of sound control particularly benefits group settings, where you can use multiple booths simultaneously without noise interference. The result is an environment that fosters concentration, encourages practice and ultimately enhances the educational experience for both students and educators.
How We Can Assist
We pride ourselves on providing exceptional customer service. Our team is not just about making sales; we’re about building relationships and helping every client find the perfect sound isolation solution for their needs.
From initial inquiry to post-purchase support, our dedicated staff is there to guide, assist, and resolve any questions. We understand that investing in a WhisperRoom is a significant decision, and our goal is to make the process as smooth and reassuring as possible. Our responsiveness, expertise, and commitment to customer satisfaction reflect our excellence in customer service.
Sizing and Configuration Recommendations
Choosing the right WhisperRoom can be daunting, given the variety of sizes and configurations available. This is where our experienced staff comes in. They are adept at understanding your specific needs and recommending the most suitable size and configuration. Whether it’s for a compact home studio, a music school, or a quiet corner of the library, we help you navigate through the options to find a booth that fits your space, budget, and purpose perfectly.

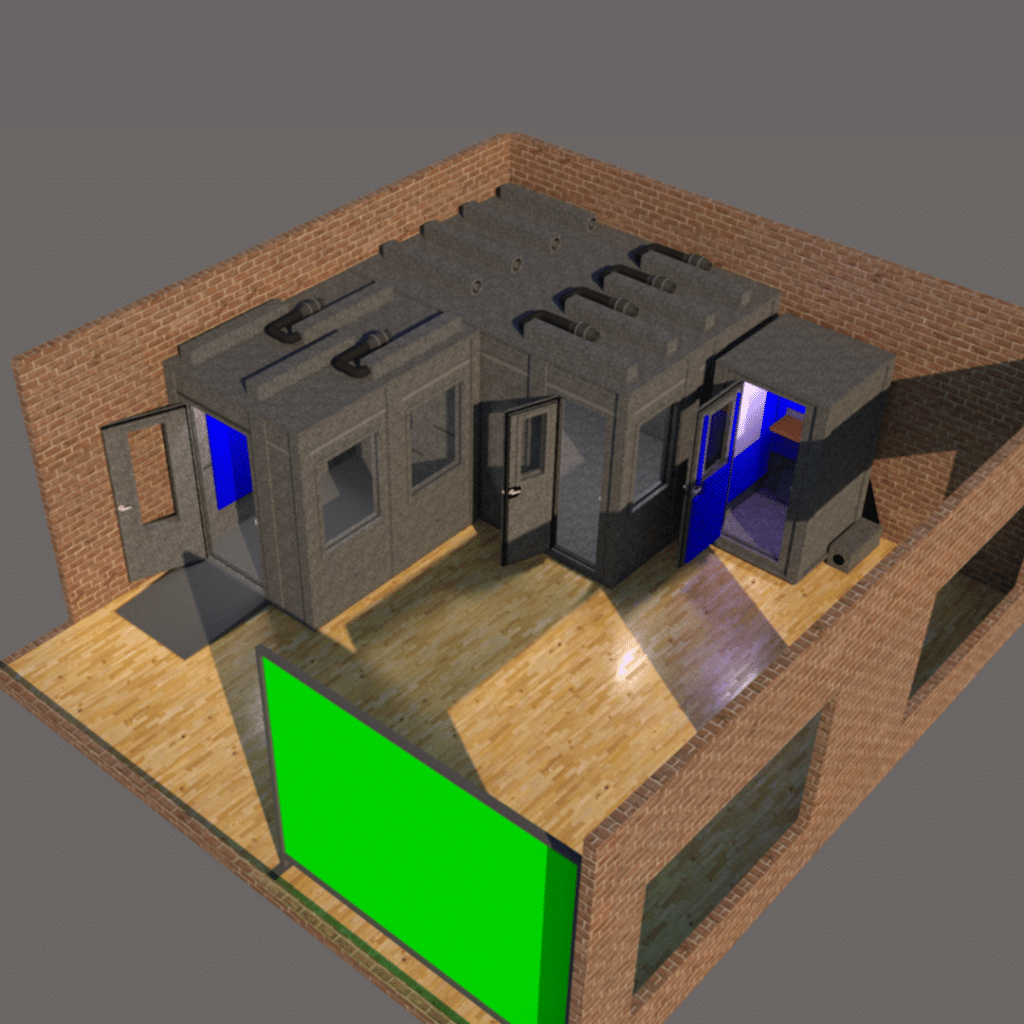
Floorplan Layouts and CAD Renderings
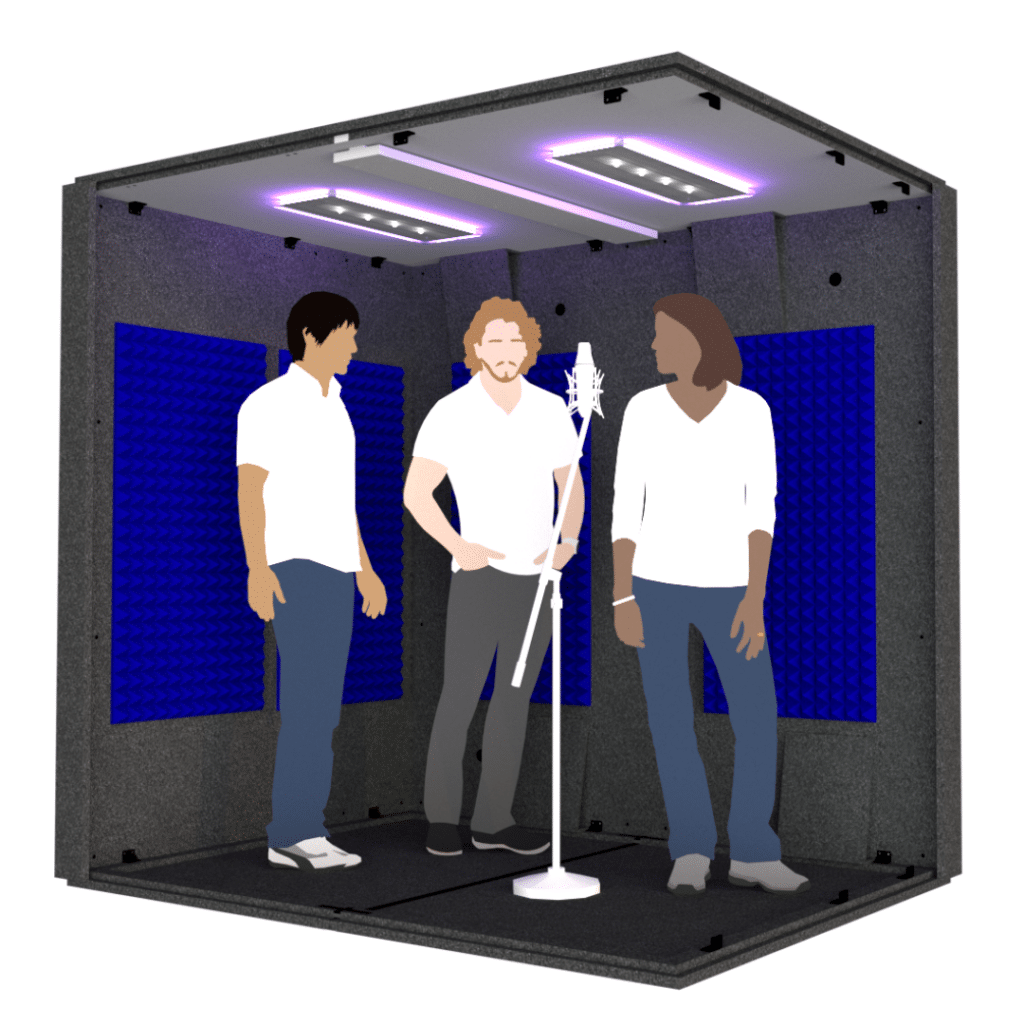
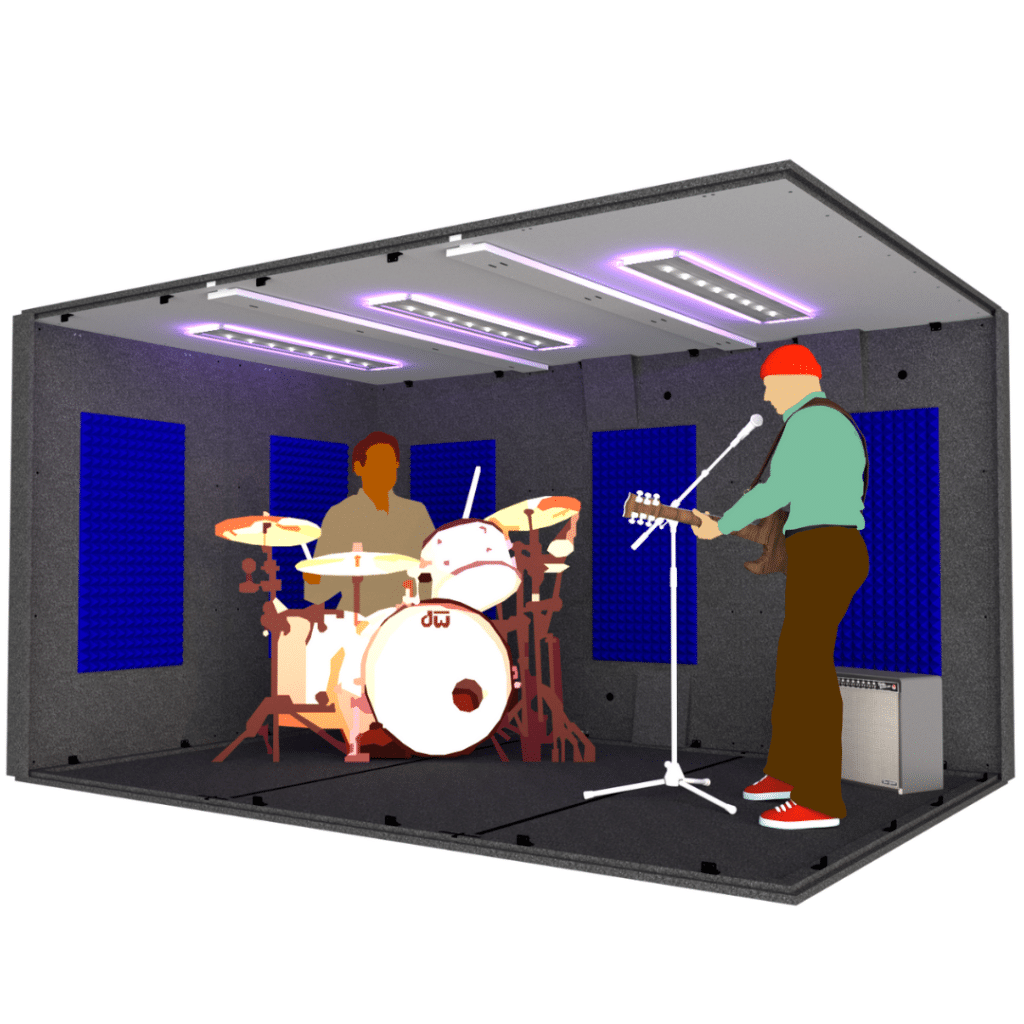
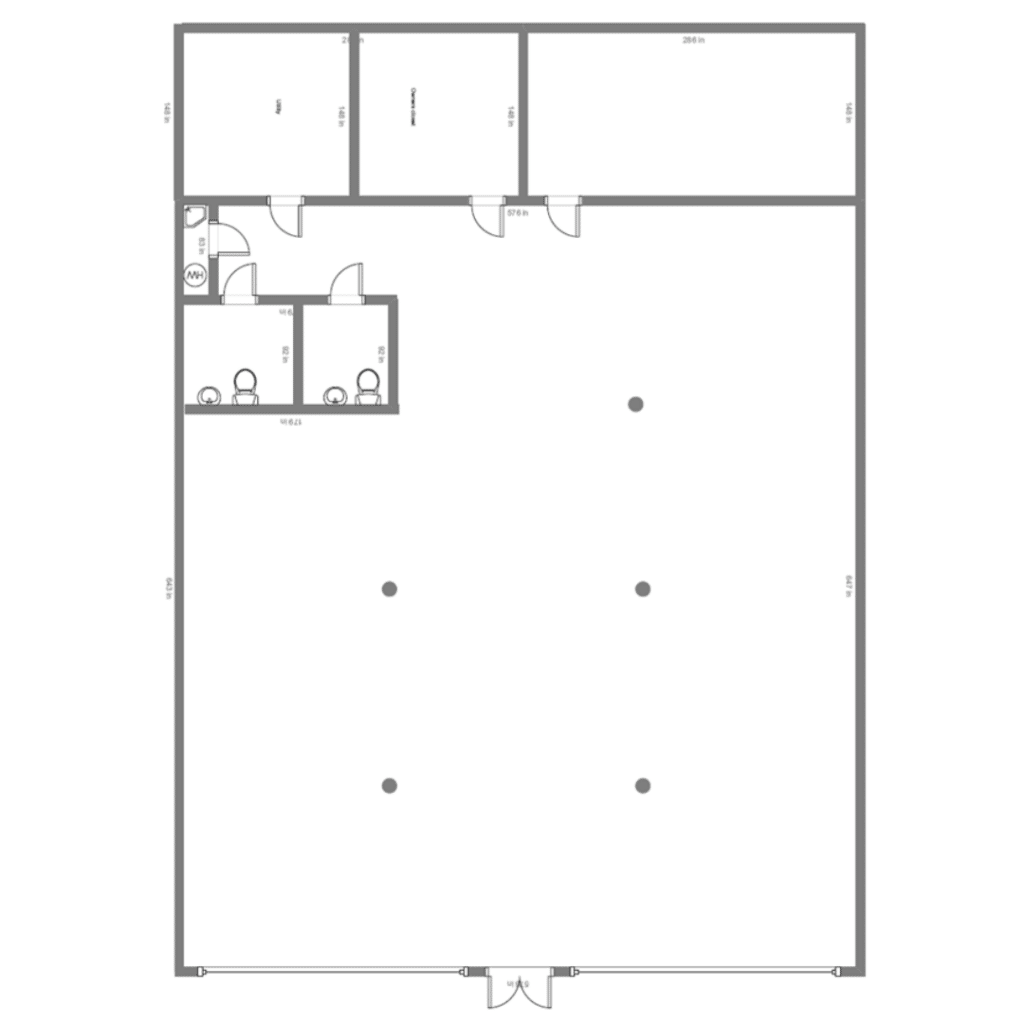
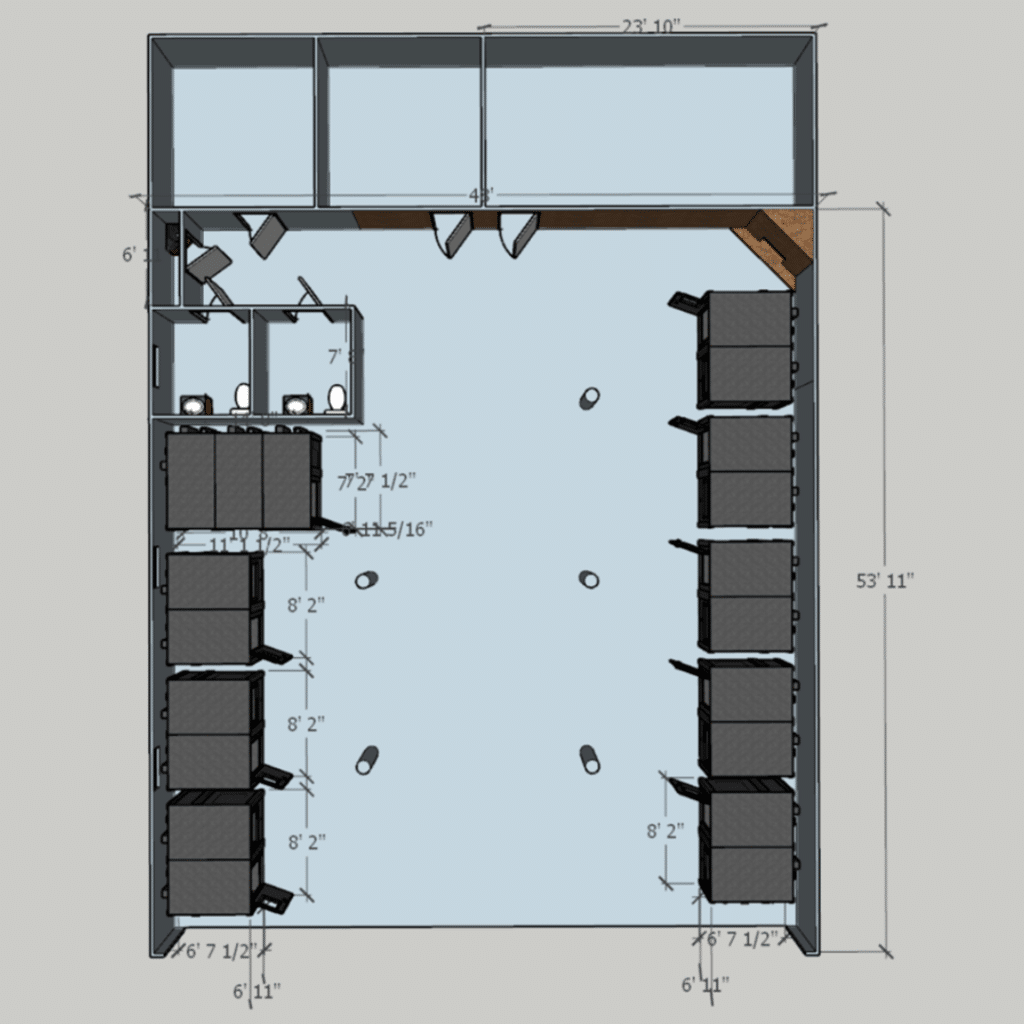
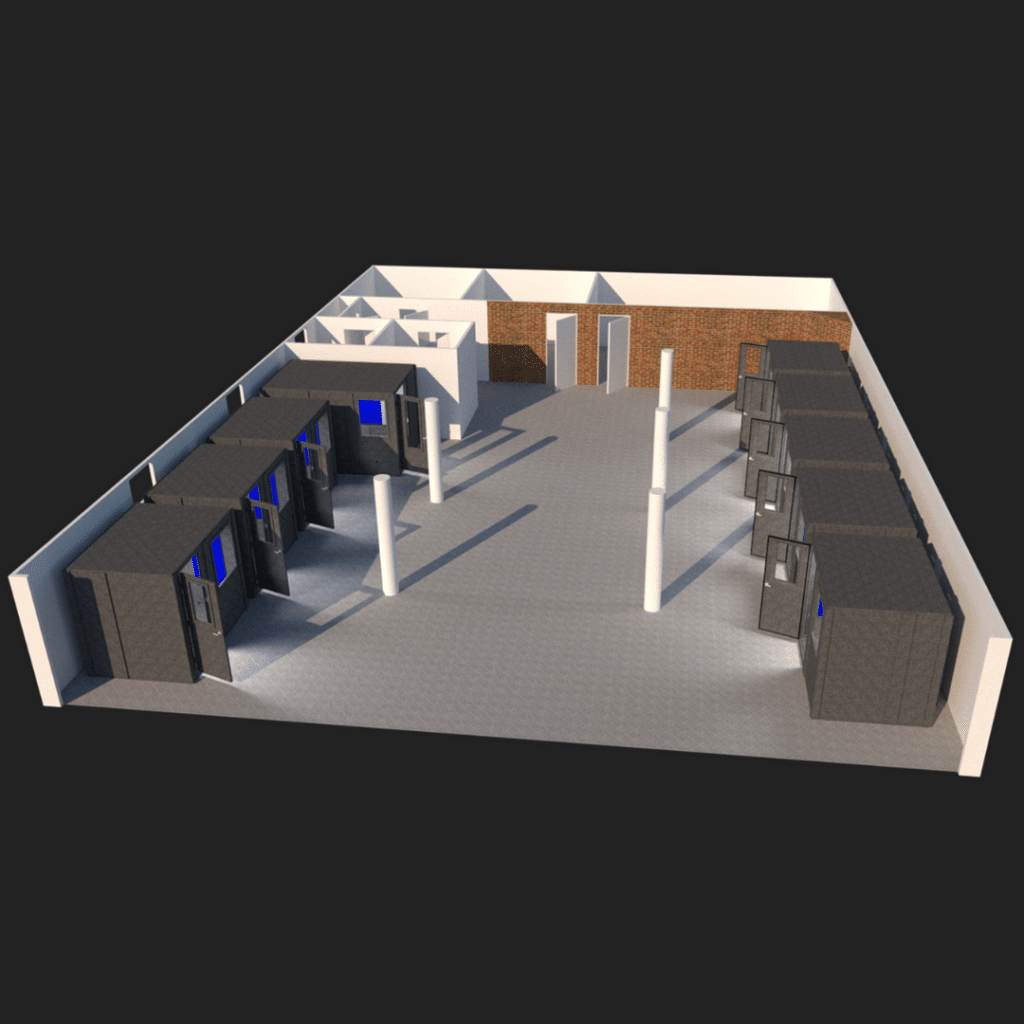
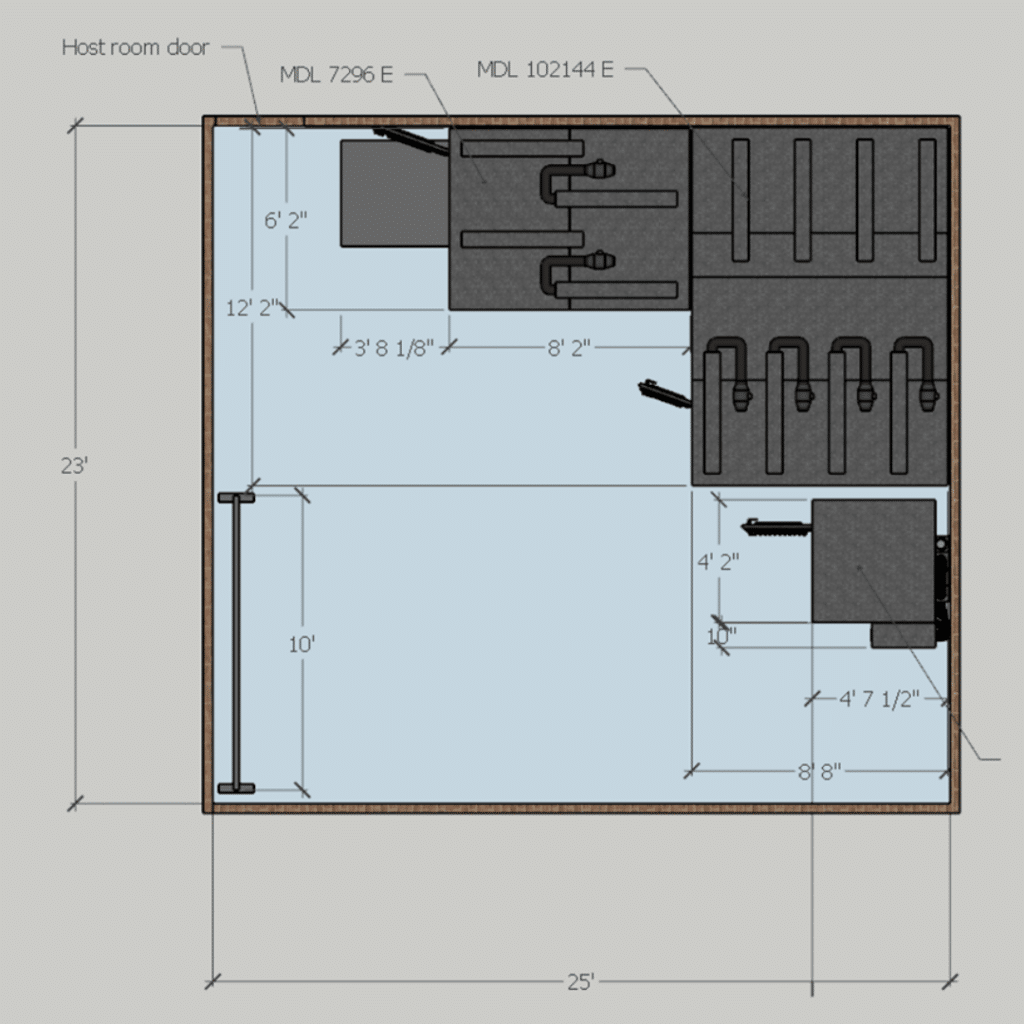
To aid in the decision-making process, we offer detailed floorplan layouts and CAD renderings. These tools are invaluable in visualizing how a WhisperRoom will fit into your existing space. They provide a clear picture of the booth’s footprint, helping to plan for optimal placement and usage. We tailor this service to each client’s unique space and requirements, showing a visualization of the WhisperRoom in your environment.
CAD Renderings
Our CAD renderings are not just theoretical designs; they are practical visualizations based on actual floorplans. By providing examples based on real-world layouts, we show how you can integrate WhisperRooms into your space and how they can coexist with other elements in the room.
Flexibility in Planning
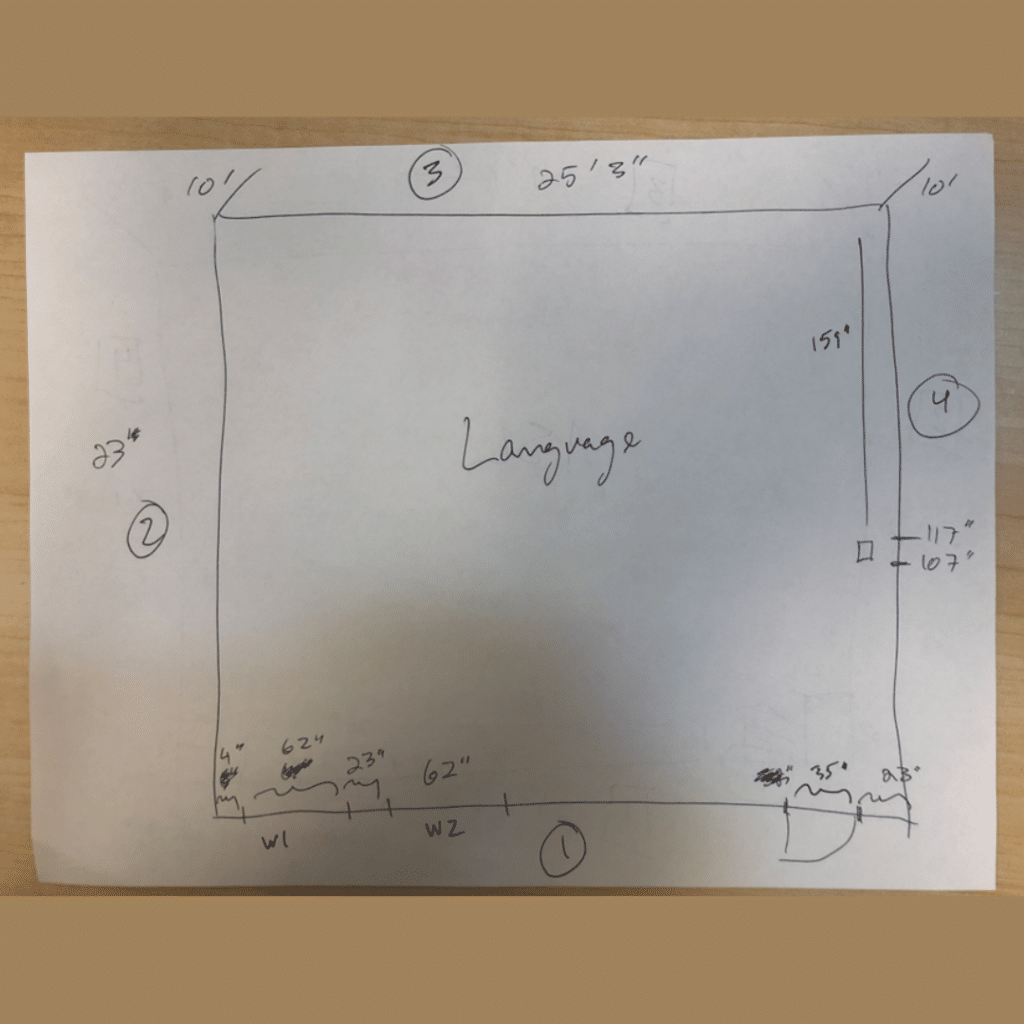
We understand that not everyone has professional architectural floorplans at their disposal. That’s why our team can work with a range of inputs, from detailed architectural drawings to simple hand-drawn diagrams. No matter what your starting point is, we can assist in planning the perfect sound isolation setup.
Delivery & Installation
We prioritize a quick and efficient shipping process. Most orders are ready to ship within 48 hours of purchase, allowing your sound isolation solution to be on its way without unnecessary delays. This swift turnaround time is part of our commitment to providing not just a quality product, but also exceptional service.
Packaging Details
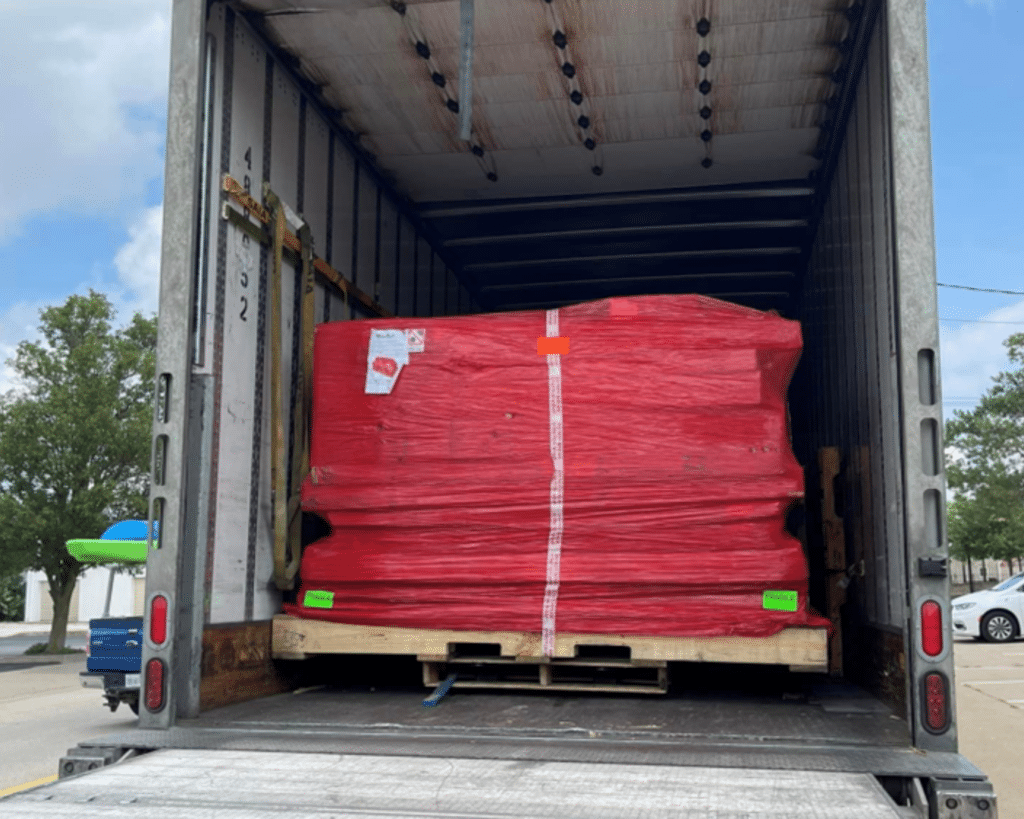
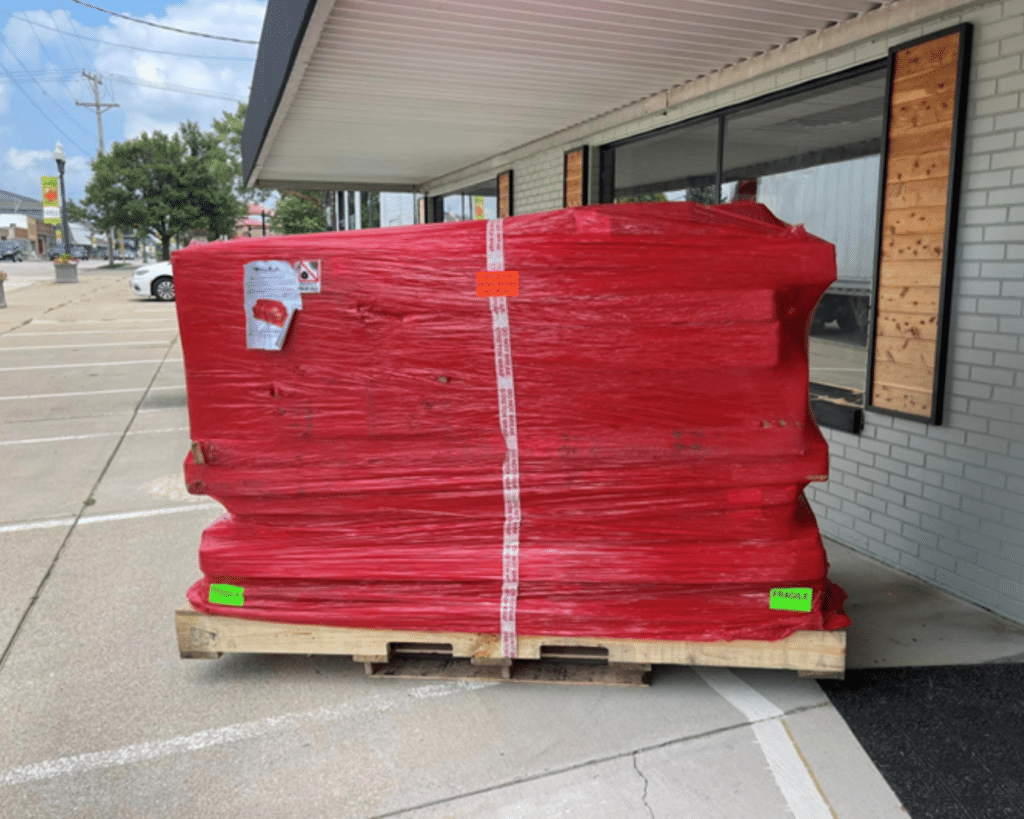
We meticulously package each WhisperRoom to make sure it arrives in pristine condition. We individually box the components, paying careful attention to protect each element during transit. These boxes are then strategically stacked on a pallet and securely shrink-wrapped, safeguarding your investment throughout the journey. This thorough packaging process reflects our dedication to quality at every step.

Delivery Process
Upon delivery, customers can expect a well-organized and straightforward process. The palletized components are delivered via semi-truck, and we provide clear communication regarding delivery schedules and requirements. While the delivery includes curbside service, customers should plan for assistance in moving the components to their desired location, as some parts are quite heavy.
Easy to Assemble
No specialized skills are needed during the assembly process – just some basic tools and a bit of your time. Watch the assembly example below to get a better idea of what to expect.
Pricing
WhisperRoom offers a range of pricing options to accommodate different budgets and requirements. The Standard (single-wall) models range from $5,545 to $22,375, while the Enhanced (double-wall) models are priced between $8,895 and $39,640. These price ranges reflect the variety of sizes and the level of sound isolation each model provides.
Optional Features Pricing
It’s important to note that optional features, such as the ADA Package, acoustic treatment add-ons, and ventilation upgrades are priced separately. This allows you to customize your WhisperRoom to your exact needs and budget.
Shipping Costs
Shipping expenses vary based on the size of the booth and the delivery location. All orders ship from East Tennessee and shipping rates are based on the location of the final destination and freight weight. We strive to provide the most cost-effective and reliable shipping options for our customers, and detailed shipping costs will be provided during the purchasing process.
Have Questions?
We invite you to contact us at 800-200-8168 or email us at info@whisperroom.com


